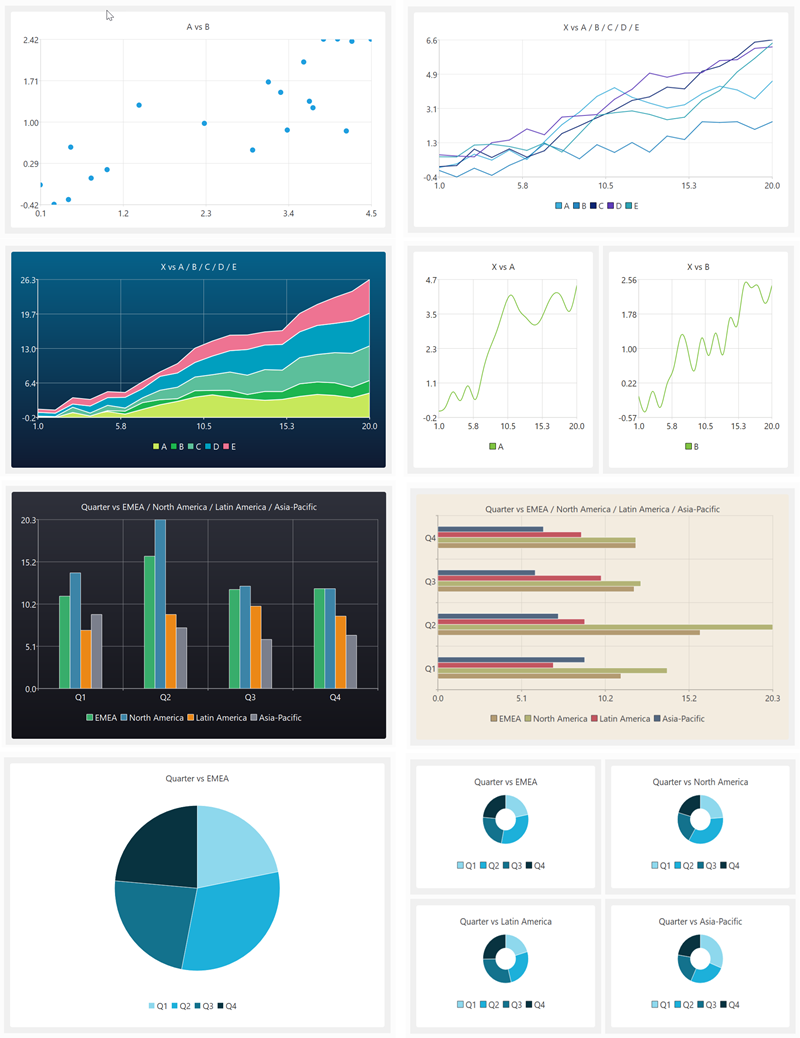
My data wrangling product, Easy Data Transform, got a major upgrade yesterday, with the addition of data visualization capabilities. Here are some examples of what it can produce in a few clicks:
You can see this new visualization feature in action in the video below:
(Likes and subscribes help me with the YouTube algorithm and are much appreciated)
Human brains are highly developed for visual processing. But data is often messy and in the wrong form for visualization. So data wrangling and visualization, tightly integrated together, is a powerful combination. It was a lot of work, but it makes Easy Data Transform a much more complete, end-to-end, solution. No more pasting data into Excel to get a chart!
At the same time, I have segmented Easy Data Transform into 2 products: Easy Data Transform Core Edition (data wrangling, one-time fee $99) and Easy Data Transform Advanced Edition (data wrangling+visualization, one-time fee $198). The Advanced Edition is a paid upgrade from the original product. Optional, of course. I sweetened the deal with a time-limited discount for existing customers who want to upgrade to Advanced Edition. The response from Easy Data Transform customers has been very positive.
Have you got some messy data, you want to turn into insights? Why not give Easy Data Transform Advanced Edition a try? It:
Runs natively on Windows and Mac.
Is drag and drop (no syntax to remember).
Does not store your precious data on someone else’s server.
Is deterministic and will not hallucinate!
Can process millions of rows in seconds.
Can create re-usable templates for repeatable processes.
You can download a free trial here. And you can get 15% off Easy Data Transform Advanced Edition until 17-Jul-2026 using this discount link.
The concept of shareware appeared in the 1980s. Developers would use relatively primitive tools to create their software, then promote it via fanzines, user groups and bulletin boards to a niche audience of shareware fans. If you wanted to try the software, you would have to get hold of a floppy disk with it on. And, if you wanted to buy a licence, you would generally have to post a physical cheque to the developer. This was being an Indie developer in hard mode. A few people made a lot of money, but most vendors made modest returns on their efforts.
I started selling my first software product in 2005. This was a good time to start up as an independent software vendor. High quality compilers, IDEs, debuggers, version control systems and web servers were widely available and mostly free. The market for software was growing, as more and more people purchased PCs and Macs. Payment processors were starting to streamline online payments. But the real revolution was being able to distribute your software worldwide via an increasingly ubiquitous Internet. And getting noticed by potential customers, while never easy, was generally achievable through writing content for search engines to find, paid online ads (such as Google Adwords pay per click), download sites or even ads in physical magazines. With a lot of hard work and a bit of luck, it was quite possible to make a decent living.
Things have continued evolving at a rapid pace over the 20 years I have been selling software. Development tools have continued to improve. Mobile and web-based software has become mainstream. App stores have appeared. Outsourcing became a thing. Subscription payment models are increasingly common. Mostly these changes haven’t affected my business too much. But recently things have begun to feel noticeably harder.
LLMs have made a major impact. While I don’t worry that LLMs will do a better job than my seating planner software, data wrangling software or visual planning software any time soon (my main competitor remains Excel), everyone is noticing that their web traffic is falling. People increasingly read LLM summaries rather than clicking on search engine links or the accompanying ads. Maybe the LLM will include a link to the website that they ripped off the content from, but probably they won’t. So writing content in the hope of traffic from search engines is becoming less and less of a viable strategy to get noticed.
Other promotional channels are getting squeezed as well. Online ads are increasingly expensive and rife with click fraud. This makes it hard to get any chance of a return, unless lifetime customer value is hundreds of dollars. Google Adwords is a case in point. In the early days, I could get lots of targeted clicks at an affordable price. But Google have done everything they can to raise bid prices and generally enshittify Adwords, so they can grab more and more of the value in every transaction. I now get barely any clicks at bid prices I am prepared to pay.
One of the few useful promotional channels left is YouTube. But it is very time-consuming to produce videos and the amount of competition is huge. I fully expect generative AI to erode its value over time, as AI slop floods the channel.
Typically promotional channels start off great for vendors and become less great over time (the law of shitty clickthrus). But then new promotional channels appear and the dance starts again. But there just doesn’t seem to be much in the way of viable new channels appearing for Indie vendors like myself. My experiment with advertising on Reddit did not go well.
LLMs potentially also make software easier to write, which is a double-edged sword. It might help you code features faster, but it also lowers the barrier, so that more people can compete. Even if your new competition is bug riddled garbage, ‘vibe coded’ by someone who doesn’t know what they are doing, it still makes it harder for your product to get noticed.
The general cost of living crisis hasn’t helped either. The super-rich are making out like bandits, but everyone else has less disposable income. And that is only going to get worse when the current AI funding circle-jerk implodes.
Each of the different software platforms also have their own issues.
Downloadable software has fallen out of fashion and the market is shrinking as increasingly people expect software to be web-based. People are also wary about downloading software onto their computers, in case it contains malware.
Web-based software is more of a service than a product and is expected to be available 24×7. Expect to get lots of very unhappy emails if your server falls over. And woe betide you if your customer data is hacked. Disappearing off somewhere for a few days without an Internet connection is not really viable, unless you have employees.
Mobile-based software is expected to be free or, at best, very cheap. So requires huge scale to make any decent return. And that is tough when there are some 2 million apps in the iPhone app store. You are also at the mercy of app store owners, who really don’t have your best interest at heart.
The new wave of AI tools must be creating new opportunities, but it seems these opportunities are mostly there for big companies, not for Indie developers. And it is very risky to build your product as a thin layer on top of someone else’s platform. Ask people who built tools and services on top of Twitter.
It feels that it is getting harder for small software vendors, like myself, to make a living. Of course, this could be just the ramblings of a 50-something-year-old, looking back through his rose-tinted varifocals. What do you think? Has it got harder?
If you want to show indie software vendors some love, check out all the great indie software for Mac and Windows (including my own Easy Data Transform and Hyper Plan) on sale at Winterfest.
I am always on the lookout for cost and time effective ways that I can market my software products. Previously, I have had quite a lot of success with Google Adwords Pay Per Click ads. However, the law of shitty clickthroughs means that advertising platforms generally get less and less profitable (for the advertisers) over time. And Google Adwords is a case study of that law in action. As Reddit is a less mature advertising platform, I thought it might still offer opportunities for a decent return. So I decided to experiment with advertising my data munging software, Easy Data Transform, on Reddit.
[By the way, I understand that nobody goes to Reddit because they want to see ads. But commercial products need to market themselves to survive, and Reddit probably wouldn’t exist without ads. Yay capitalism.]
Setup
The basic process to get started with Reddit Ads is:
Sign up for a Reddit Ads account.
Enter your details and credit card number.
Create a campaign.
Create one or more ad groups for your campaign. Choose a bid for each ad group, which countries you want it shown in and who you want it shown to.
Create one or more ads for each group.
Add the Reddit tracking pixel to every page of your website.
Set up conversion goals.
All pretty standard stuff for anyone who has used Google Adwords. The twist with Reddit is that you can advertise to communities (sub-Reddits), rather than based on search keywords. For example, Easy Data Transform is a much better tool for most data wrangling tasks than Excel, so I can bid to show ads targeted at Excel users in communities such as: reddit.com/r/excel/ and reddit.com/r/ExcelTips/.
Like Adwords, there are various ways to bid. I don’t want the advertising platform to set the bid prices for me (because I’m not insane), so I opted for fixed price bids of between $0.20 and $0.40 per click. Some of the ad groups suggested much higher bids than that. For example, the suggested bid for my Excel ad group is $0.79 to $4.79 per click!
However, Easy Data Transform is only a one time payment of $99. Paying more than $0.40 per click is unlikely to be profitable for me, especially when you factor in support costs. So that is the maximum I was prepared to bid. Also, the suggested bids are just the ad platform trying to push up the bid price. Something that anyone who has used Google Adwords will be all too familiar with. I was still able to get clicks, bidding significantly less than the recommended minimum.
I also set a daily maximum for each ad group, just in case I had messed up and added a zero in a bid somewhere.
I created multiple ads for each ad group, with a range of different text and images specific to the communities targeted. Here are some of the ones I ran in the Excel ad group:
I didn’t try to use edgy images or memes, because that isn’t really my style. There is an option to turn comments on below ads. As Reddit users are generally not well-disposed to ads, I didn’t try turning this on.
Based on hard-won experience with Google Adwords, I only set my ads to run in wealthy countries. I also restricted my ads to people on desktop devices as Easy Data Transform only runs on the desktop.
When Easy Data Transform is installed, it opens a page on my website with some instructions. So I used this to set up the Reddit conversion tracking to count the number of times a click ended up with a successful install of either the Windows or Mac version of Easy Data Transform.
I monitored the performance of the ads and disabled those that has poor click through or conversion rates and made variants of the more successful ones. Darwinian evolution for ads. I ended up creating 70 ads across 15 ad groups, targeting 50 communities.
I wasted an hour trying to get Reddit to recognize that I had installed their tracking pixel. But, overall, I found the Reddit Ads relatively simple to setup and monitor. Especially compared to the byzantine monstrosity that Google Adwords has become.
Reddit advertises a deal where you can get $500 of free ads.
But the link was broken when I clicked on it. Someone else I spoke to said they had tried to find out more, but gave up when they found out you had to have a phone call with a sales person at Reddit.
Results
I ran my experiment from 08-Jul-2025 to 31-Jul-2025. These are the stats, according to reddit.
Spend
$851.04
Impressions
490,478
Clicks
3,585
Windows installs
177
Mac installs
63
Total installs
240
Click Through Rate
0.73%
Cost Per Click
$0.24
Click to install conversion rate
6.59%
Cost Per Install
$3.55
I generally reckon that somewhere around 10% of people who install are going on to buy. So $3.55 per install would mean around $35.50 cost per sale, which is reasonable for a $99 sale. So that all looks quite encouraging.
But, comparing the Reddit number to the numbers I get from Google Analytics and my web logs, I think the Reddit numbers are dubious. At best. In a week when Reddit says it sent me 1174 clicks, Google Analytics says I received 590 referrals from Reddit and my web log says I received 639 referrals from Reddit. Some of the difference may be due to comparing sessions with clicks, time zones etc. But it looks fishy.
The discrepancy is even greater if you look at conversions. The total installs per week reported by Google Analytics and my web logs didn’t go up anything like you would expect from looking at the Reddit conversion numbers. If you dig a bit further, you find that Reddit uses ‘modeled conversions‘ to:
“Gain a more complete view of your ads performance with modeled conversions, which leverages machine learning to bridge attribution gaps caused by signal loss.”
Uh huh. Sounds suspiciously like ‘making shit up’.
And then there are the sales. Or lack of. I don’t have detailed tracking of exactly where every sale comes from. But I estimate that my $851 outlay on ads resulted in between $0 and $400 in additional sales. Which is not good, given that I don’t have VC money to burn. Especially when you factor in the time taken to run this experiment.
The top 5 countries for spend were:
Italy
Spain
France
Germany
Singapore
The US only accounted for 0.28% of impressions, 13 clicks and $3.81 in spend. Presumably because the US market is more competitive, and I wasn’t bidding enough to get my ads shown.
You can look at various breakdowns by country, community, device etc. This is helpful. But some of the breakdowns make no sense. For example, it says that 41% of the click throughs from people reading Mac-related communities were from Windows PCs. That sounds very unlikely!
But the worst is still to come. Feast your eyes on this Google Analytics data from my website:
Average engaged time per active user (seconds)
Engaged sessions per active user
Google / organic
33
0.75
Successfulsoftware.net / referral
31
0.74
Youtube.com / referral
27
0.86
Chatgpt.com / referral
24
0.69
Google / CPC
16
0.65
Reddit / referral
8
0.25
8 seconds! That is the mean, not the median. Yikes. And 75% of the sessions didn’t result in any meaningful engagement. This makes me wonder if the majority of the Reddit clicks are accidental.
I had intended to spend $1000 on this experiment, but the results were sufficiently horrible that I stopped before then.
If I had spent a lot of time tweaking the ad images and text, landing pages, communities and countries, then I could probably have improved things a bit. But I doubt I could ever get a worthwhile return on my time and money.
If the lifetime value of a sale is a lot more than $99 for you, or your product is a good fit for Reddit, then Reddit Ads might be worth trying. But be sure not to take any Reddit numbers at face value.
I released version 1 of my table seating planning software, PerfectTablePlan, in February 2005. 20 years ago this month. It was a different world. A world of Windows, shareware and CDs. A lot has changed since then, but PerfectTablePlan is now at version 7 and still going strong.
PerfectTablePlan v1
PerfectTablePlan v7
I have released several other products since then, and done some training and consulting, but PerfectTablePlan remains my most successful product. It’s success is due to a lot of hard work, and a certain amount of dumb luck.
I was getting married and I volunteered to do the seating plan for our wedding reception. It sounded like a relatively straightforward optimization problem, as we only had 60 guests and no family feuds to worry about. But it was surprisingly difficult to get right. I looked around for some software to help me. There were a couple of software packages, but I wasn’t impressed. I could do better myself! So I wrote a (very rough) first version, which I used for our wedding.
Things weren’t going great at my day job, at a small software startup. Maybe I could commercialize my table planner? I was a bit wary, as my potential competitors all seemed rather moribund and I didn’t think I would be able to make a living off it. But I thought I could do everything worth doing in 6-12 months and then start on the next product. Wrong on both counts!
Web-based software was still in its infancy in 2005. So I decided to write it as desktop software using C++ and cross-platform framework Qt, which I had plenty of experience in. Initially, I just released a Windows version. But I later added a Mac version as well. Qt has had its commercial ups and downs in the last 20 years, but it has grown with me and is now very robust, comprehensive and well documented. I think I made a good choice.
I financed PerfectTablePlan out of my own savings and it has been profitable every year since version 1 was launched. I could have taken on employees and grown the business, but I preferred to keep it as a lifestyle business. My wife does the accounts and proof reading and I do nearly everything else, with a bit of help from my accountant, web designers and a few other contractors. I don’t regret that decision. 20 years without meetings, ties or alarm clocks. My son was born 18 months after PerfectTablePlan was launched and it has been great to have the flexibility to be fully present as a Dad.
CDs, remember them? I sent out around 5,000 CDs (with some help from my father), before I stopped shipping CDs in 2016.
During the lifetime of PerfectTablePlan it became clear that things were increasingly moving to the web. But I couldn’t face rewriting PerfectTablePlan from scratch for the web. Javascript. Ugh. Also PerfectTablePlan is quite compute intensive, using a genetic algorithm to generate an automated seating plan and I felt it was better running this on the customer’s local computers than my server. And some of my customers consider their seating plans to be confidential and don’t want to store them on third party servers. So I decided to stick with desktop. But, if I was starting PerfectTablePlan from scratch now, I might make a different decision.
Plenty of strange and wonderful things have happened over the last 20 years, including:
PerfectTablePlan has been used by some very famous organizations for some very famous events (which we mostly don’t have permission to mention). It has seated royalty, celebrities and heads of state.
A mock-up of PerfectTablePlan, including icons I did myself, was used without our permission by Sony in their ‘Big day’ TV comedy series. I threated them with legal action. Years later, I am still awaiting a reply.
I got to grapple with some interesting problems, including the mathematics of large combinatorial problems and elliptical tables. Some customers have seated 4,000 guests and 4000! (4000x3999x3998 .. x 1) is a mind-bogglingly huge number.
A well known wedding magazine ran a promotion with a valid licence key clearly visible in a photograph of a PerfectTablePlan CD. I worked through the night to release a new version of PerfectTablePlan that didn’t work with this key.
I once had to stay up late, in a state of some inebriation, to fix an issue so that a world famous event wasn’t a disaster (no I can’t tell you the event).
The lowest point was the pandemic, when sales pretty much dropped to zero.
Competitors and operating systems have come and gone and the ecosystem for software has changed a lot, but PerfectTablePlan is still here and still paying the bills. It is about 145,000 lines of C++. Some of the code is a bit ugly and not how I would write it now. But the product is very solid, with very few bugs. The website and user documentation are also substantial pieces of work. The PDF version of the documentation is nearly 500 pages.
I now divide my time between PerfectTablePlan and my 2 other products: data wrangling software Easy Data Transform and visual planner Hyper Plan. Having multiple products keeps things varied and avoids having all my eggs in one basket. In May 2024 I released PerfectTablePlan v7 with a load of improvements and new features. And I have plenty of ideas for future improvements. I fully expect to keep working on PerfectTablePlan until I retire (I’m 59 now).
My main development PC is now 5 years old and the end of life for Windows 10 is looming. I might be upgrade it to Windows 11 (there is apparently a BIOS hack if your chip doesn’t have the required TPM module), but it is quite crufty from 5 years of daily use. And it recently crashed and spent 20 minutes doing a Windows spontaneous repair, which is not very confidence inspriring. Plus the thought of a faster processor, more memory and a bigger SSD is always alluring. Time for a spanky new Windows 11 PC.
I ordered a PC to my own spec from pcspecialist.co.uk using their online configurator. I have used them a few times previously and have been suitably impressed with the service.
The new PC has:
Windows 11 Home
AMD Ryzen 9 9900X 12-Core processor
NVidia 3050 graphics card
64 GB DDR5 RAM
4 TB Samsung PRO M.2 SSD
2 x Seagate Barracuda 4TB HDDs
Corsair Gold Ultra Quiet 650W power supply
Reliability in the key issue for me, so I won’t be messing around with overclocking or other tweaks.
I’ve had a power supply blow up and take out the motherboard before, so I went for a branded power supply.
I didn’t see any real need for Windows 11Pro.
I wanted a quiet case that would sit under my desk, rather than the bling LED disco cases offered by PC Specialist. Or, even worse, a white case (god no). So I ordered a black mid size Fractal Design Define 7 case and had it delivered to them for the build.
The finished PC turned up after a couple of weeks. They have did a nice job, with some neat cabling.
Now it is just the tedious job of setting it all up. Windows offered to copy across the settings from my previous machine, but I wanted a cruft-free, clean install. So I manually installed everything from scratch:
Where possible I tried to download software direct from the manufacturers website. In a few cases where I didn’t want to pay to upgrade, and the old version wasn’t available, I used old downloads that I had kept.
I needed Microsoft Visual Studio 2019, rather than 2022, due to compatibility issues with Qt. The 2019 version is not easy to find online, but is currently still available.
The Easy Data Transform compile time has gone from 51 seconds, on the old PC, to 26 seconds, on the new PC.
An Easy Data Transform benchmark that inputs, joins, sorts and outputs a million row dataset, has gone from 14.3 seconds , on the old PC, to 10.3 seconds, on the new PC.
So a significant speed improvement.
Currently I have 3 PCs and 1 Mac, 3 monitors, 4 mice and 4 keyboards. It is a mess. I have tried a physical KVM switch in the past, but it felt very clunky. Following a tipoff from a friend, I am going to investigate www.sharemouse.com as a way to make this more manageable. Do you have a good way to manage multiple monitors, mice and keyboards? Please let me know in the comments.
I wanted to be able to read and write Excel file on Windows and Mac from my C++/Qt application, whether Excel is installed or not. I would rather commit suicide with a cheese grater, than try to write my own code to parse whatever horrific format Excel is written in. So I looked around for a library.
I ended up buying a licence for LibXL, from XLWare, back in 2019. It has been working great ever since. I now also use it in PerfectTablePlan v7.
Things to like:
Available as a library for Windows, Mac, Linux and iOS (I have only used it for Windows and Mac, so far).
Accessible from lots of languages, including: C, C++, .Net, Delphi, PHP, Python, PowerBASIC and Fortran.
Example code is available in C++, C, C# and Delphi.
Good support.
Regular updates.
Reasonable pricing.
No per-user fees.
The API is a little low-level for my taste, but I guess that is inevitable when you support C as well as C++. Reading and writing is slow compared to reading and writing the same data to/from a CSV file. But, no doubt, that is due to the limitations of the Excel file format.
I don’t have any affiliation with LibXL beyond being a paying customer, and I haven’t been asked to write this. I just wanted to give a shout-out to the developer, Dmytro, for his sterling work. Long may it continue.
I released Easy Data Transform v2 today. After no fewer than 80 (!) v1 production releases since 2019, this is the first paid upgrade.
Major improvements include:
Schema versioning, so you can automatically handle changes to the column structure of an input (e.g. additional or missing columns).
A new Verify transform so you can check a dataset has the expected values.
Currently there are 48 different verification checks you can make:
At least 1 non-empty value
Contains
Don’t allow listed values
Ends with
Integer except listed special value(s)
Is local file
Is local folder
Is lower case
Is sentence case
Is title case
Is upper case
Is valid EAN13
Is valid email
Is valid telephone number
Is valid UPC-A
Match column name
Matches regular expression
Maximum characters
Maximum number of columns
Maximum number of rows
Maximum value
Minimum characters
Minimum number of columns
Minimum number of rows
Minimum value
No blank values
No carriage returns
No currency
No digits
No double spaces
No duplicate column names
No duplicate values
No empty rows
No empty values
No gaps in values
No leading or trailing whitespace
No line feeds
No non-ASCII
No non-printable
No punctuation
No symbols
No Tab characters
No whitespace
Numeric except listed special value(s)
Only allow listed values
Require listed values
Starts with
Valid date in format
You can see any fails visually, with colour coding by severity:
Side-by-side comparison of dataset headers:
Side-by-side comparison of dataset data values:
Lots of extra matching options for the Lookup transform:
Allowing you to do exotic lookups such as:
Plus lots of other changes.
In v1 there were issues related to how column-related changes cascaded through the system. This was the hardest thing to get right, and it took a fairly big redesign to fix all the issues. As a bonus, you can now disconnect and reconnect nodes, and it remembers all the column-based options (within certain limits). These changes make Easy Data Transform feel much more robust to use, as you can now make lots of changes without worrying too much about breaking things further downstream.
Easy Data Transform now supports:
9 input formats (including various CSV variants, Excel, XML and JSON)
66 different data transforms (such as Join, Filter, Pivot, Sample and Lookup)
11 output formats (including various CSV variants, Excel, XML and JSON)
56 text encodings
This allows you to snap together a sequence of nodes like Lego, to very quickly transform or analyse your data. Unlike a code-based approach (such as R or Python) or a command line tool, it is extremely visual, with pretty-much instant feedback every time you make a change. Plus, no pesky syntax to remember.
Eating my own dogfood, using Easy Data Transform to create an email marketing campaign from various disparate data sources (mailing lists, licence key databases etc).
Easy Data Transform is all written in C++ with memory compression and reference counting, so it is fast and memory efficient and can handle multi-million row datasets with no problem.
While many of my competitors are transitioning to the web, Easy Data Transform remains a local tool for Windows and Mac. This has several major advantages:
Your sensitive data stays on your computer.
Less latency.
I don’t have to pay your compute and bandwidth costs, which means I can charge an affordable one-time fee for a perpetual licence.
I think privacy is only going to become ever more of a concern as rampaging AIs try to scrape every single piece of data they can find.
Usage-based fees for online data tools are no small matter. For a range of usage fee horror stories, such as enabling debug logging in a large production ETL pipeline resulting in $100k of extra costs in a week, see this Reddit post. Some of my customers have processed more than a billion rows in Easy Data Transform. Not bad for $99!
It has been a lot of hard work, but I am please with how far Easy Data Transform has come. I think Easy Data Transform is now a comprehensive, fast and robust tool for file-based data wrangling. If you have some data to wrangle, give it a try! It is only $99+tax ($40+tax if you are upgrading from v1) and there is a fully functional, 7 day free trial here:
I am very grateful to my customers, who have been a big help in providing feedback. This has improved the product no end. Many heads are better than one!
The next big step is going to be adding the ability to talk directly to databases, REST APIs and other data sources. I also hope at some point to add the ability to visualize data using graphs and charts. Watch this space!
The authenticode digital certificate I bought back in 2019 expired recently, so I had to get a new certificate (you can’t renew a certificate, as such, you just need to buy a new one). A few months before the expiry I emailed KSoftware.net, who I had bought previous digital certificates from and with whom I had always had a good experience in the past. No reply. I tried a couple more times, including the personal email of Mitchell, the founder. Nothing. Someone else told me they had had similar experiences. Their recent trustpilot ratings are a horror show. And the copyright date on their website is ‘2003 – 2021’. But they were still advertising on Google Adwords. I have no idea what is happening here. If you are reading this Mitchell, I hope you are ok.
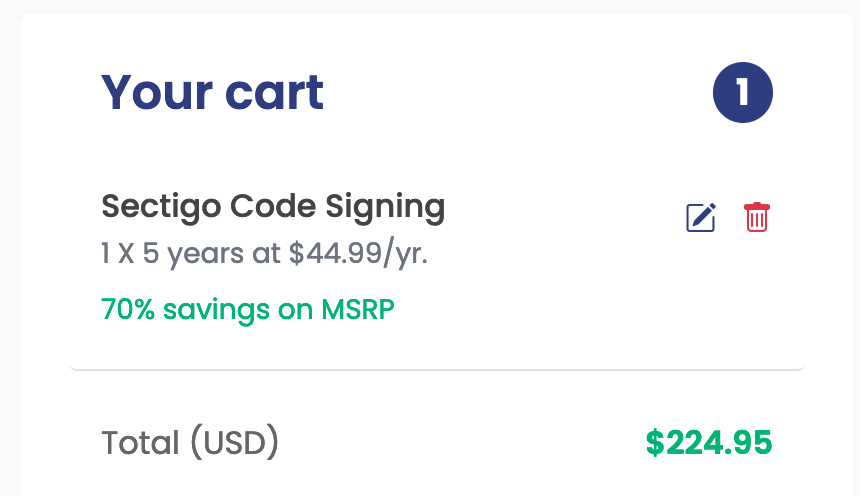
With KSoftware out of the picture I looked elsewhere. Eventually I ended up buying a new Sectigo certificate from signmycode.com. I partly chose them because they offered a 5 year certficate and the less often I have to go through the ball ache of a getting a new certificate, the better. The experience was decidely mixed.
The good:
The prices seem reasonable, compared to other options.
Support was responsive. English didn’t appear to be their first language, but it was good enough.
I got my new certificate within a few days and have had no issues with it so far. The change in certificate seems to be set off a few customer’s anti-virus software, but that was to be expected.
The mediocre:
The online guidance and documentation on the process was mediocre, at best.
I was a bit confused about whether I had to click ‘Buy now’ or ‘Renew now’. It seems this is more marketing/SEO purposes and it doesn’t matter which you click.
I had to send them a photo of me holding a government ID. This felt pretty uncomfortable, but might be something mandated by the certificate companies.
The bad:
After I got my certificate I checked the expiry date and it was only 3 years. When I queried this I was rold that the ‘5 year certificate’ I thought I had bought is not a 5 year certificate. It is a 3 year certificate, then I have to apply for a new pre-paid 2 year certificate in 3 years time.
This is what you see when you click on ‘Buy now’:
When you see this, wouldn’t you expect to get a single 5 year certificate? If there was anything explaining that this was 2 separate certificates, I didn’t notice it. It certainly didn’t mention it on their home page. This feels deceptive to me.
Who knows if this company will still be there in 3 years time? I emailed them and told them I wanted to keep the new 3 year certificate and for them to refund the 2 year certificate. They said they would only refund the entire order and then I would have to start the whole process all over again. They also claimed:
“renewal validation is much more easy then buying a new certificate as most of the validation part is getting carry forward.”
Easy Data Transform and Hyper Plan Professional edition are both on sale for 25% off at Winterfest 2022. So now might be a good time to give them a try (both have free trials). There is also some other great products from other small vendors on sale, including Tinderbox, Scrivener and Devonthink. Some of the software is Mac only, but Easy Data Transform and Hyper Plan are available for both Mac and Windows (one license covers both OSs).
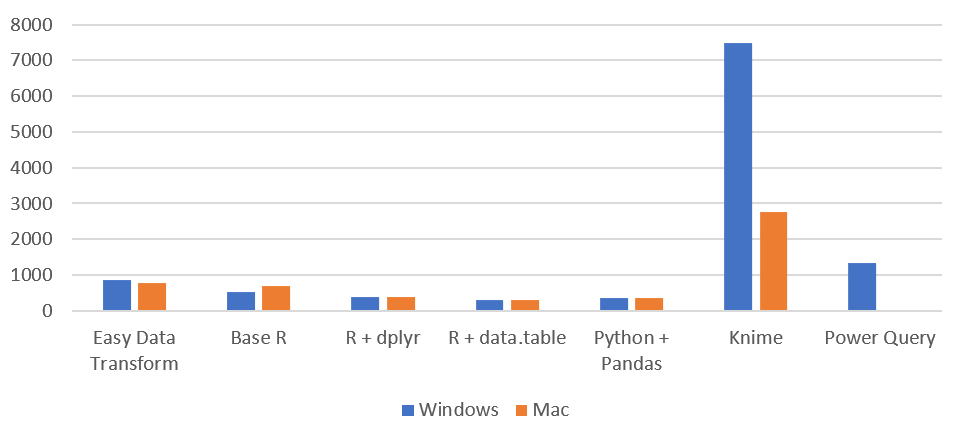
I have been gradually improving my data wrangling tool, Easy Data Transform, putting out 70 public releases since 2019. While the product’s emphasis is on ease of use, rather than pure performance, I have been trying to make it fast as well, so it can cope with the multi-million row datasets customers like to throw at it. To see how I was doing, I did a simple benchmark of the most recent version of Easy Data Transform (v1.37.0) against several other desktop data wrangling tools. The benchmark did a read, sort, join and write of a 1 million row CSV file. I did the benchmarking on my Windows development PC and my Mac M1 laptop.
Here is an overview of the results:
Time by task (seconds), on Windows without Power Query (smaller is better):
I have left Excel Power Query off this graph, as it is so slow you can hardly see the other bars when it is included!
Time by task (seconds) on Mac (smaller is better):
Memory usage (MB), Windows vs Mac (smaller is better):
So Easy Data Transform is nearly as fast as it’s nearest competitor, Knime, on Windows and a fair bit faster on an M1 Mac. It is also uses a lot less memory than Knime. However we have got some way to go to catch up with the Pandas library for Python and the data.table package for R, when it comes to raw performance. Hopefully I can get nearer to their performance in time. I was forbidden from including benchmarks for Tableau Prep and Alteryx by their licensing terms, which seems unnecessarily restrictive.
Looking at just the Easy Data Transform results, it is interesting to notice that a newish Macbook Air M1 laptop is significantly faster than a desktop AMD Ryzen 7 desktop PC from a few years ago.