The application icon for my data wrangling software looks like this on a Mac up to macOS 15.x:
However, Apple has once again nuked everything from orbit. Now it looks like this in macOS 26 Tahoe when the application is inactive or if you choose any Icon & widget style apart from Default:
Thanks Apple. It is such a joy to develop for Mac.
With some help from a designer and hours of going around in circles, I have finally managed to fix things to support the new ‘liquid glass’ look. This is how it should look in the next release, depending on the setting in Appearance>Icon & widget style:
Default
Dark
Clear/Light
Clear/Dark
Tinted
I’m not convinced it is an improvement in terms of usability. But, at least my app icon doesn’t look like shit.
What you need to know
The new macOS 26 icon format is .icon. It is a folder full of various resources and is totally different to the old .icns format.
The .icon file can be created by Apple Icon Composer. I used a freelancer on Fiverr who did a good job of converting my existing vector artwork and was very cheap. The .icon file should contain a maximum of 4 groups (which seem to be like layers) other it won’t compile to a resource properly.
Note that macOS hide the extension of .icon folders by default, which was a source of some confusion.
The .icon file then has to be processed into an Assets.car file using actool. For example:
xcrun actool application.icon --compile ./icons/macosx --output-format human-readable-text --notices --warnings --errors --output-partial-info-plist temp.plist --app-icon Icon --include-all-app-icons --enable-on-demand-resources NO --development-region en --target-device mac --minimum-deployment-target 26.0 --platform macosx
You will need to change the bold parts above, as appropriate.
I had to update my Mac laptop to macOS 26, Xcode 26 and the macOS 26 SDK for the above to work.
You can check the Assets.car file using assetutil to create a .json file listing the contents:
You will need to change the bold part above, as appropriate. I believe the string value if based on the file stem of the original .icon file. But I’m not 100% sure about that. Look at the .json file produced by assetutil for clues. Mine contained this:
The temp.plist file generated by actool is apparently supposed to give you a .plist file that refers to the icon resource. It didn’t and was completely useless.
Then place both Assets.car and your old .icns file in the Resource folder of your application (before you sign it). That way it should look ok on both macOS 26 and earlier OSes.
If you develop using XCode, it will probably do some of the above for you. I develop in C++/Qt using Qt Creator, so I had to do it all manually.
I was able to generate the Assets.car on macOS 26 and then incorporate it into the build on my macOS 12 development machine.
I hope the above saves someone a few hours. Now I need to repeat the process for PerfectTablePlan.
You might also find this post useful (where I got some of the information):
I wanted to be able to read and write Excel file on Windows and Mac from my C++/Qt application, whether Excel is installed or not. I would rather commit suicide with a cheese grater, than try to write my own code to parse whatever horrific format Excel is written in. So I looked around for a library.
I ended up buying a licence for LibXL, from XLWare, back in 2019. It has been working great ever since. I now also use it in PerfectTablePlan v7.
Things to like:
Available as a library for Windows, Mac, Linux and iOS (I have only used it for Windows and Mac, so far).
Accessible from lots of languages, including: C, C++, .Net, Delphi, PHP, Python, PowerBASIC and Fortran.
Example code is available in C++, C, C# and Delphi.
Good support.
Regular updates.
Reasonable pricing.
No per-user fees.
The API is a little low-level for my taste, but I guess that is inevitable when you support C as well as C++. Reading and writing is slow compared to reading and writing the same data to/from a CSV file. But, no doubt, that is due to the limitations of the Excel file format.
I don’t have any affiliation with LibXL beyond being a paying customer, and I haven’t been asked to write this. I just wanted to give a shout-out to the developer, Dmytro, for his sterling work. Long may it continue.
Winterfest 2023 is on. Loads of quality software for Mac and Windows from independent vendors, at a discount. This includes my own Easy Data Transform and Hyper Plan, which are on sale with a 25% discount.
I have been using altool to notarize my Mac apps for some years. However Apple, being Apple, have deprecated altool in favour of the new notarytool. altool will stop working at some point in 2023. And Apple, being Apple, have made little attempt to keep consistency between the two.
I didn’t find anything online to tell me how arguments between the two tools related. Consequently I spent a while trying to guess which arguments mapped to which. I got locked out for a while for trying to wrong combination too many times. In the end I went from this:
On the plus side the --wait option doesn’t exit until the notarization is complete, which means you can easily do you whole build, sign and notarize process in a single script. Hoorah.
Note that you still need to run the ‘stapling’ step after notarization:
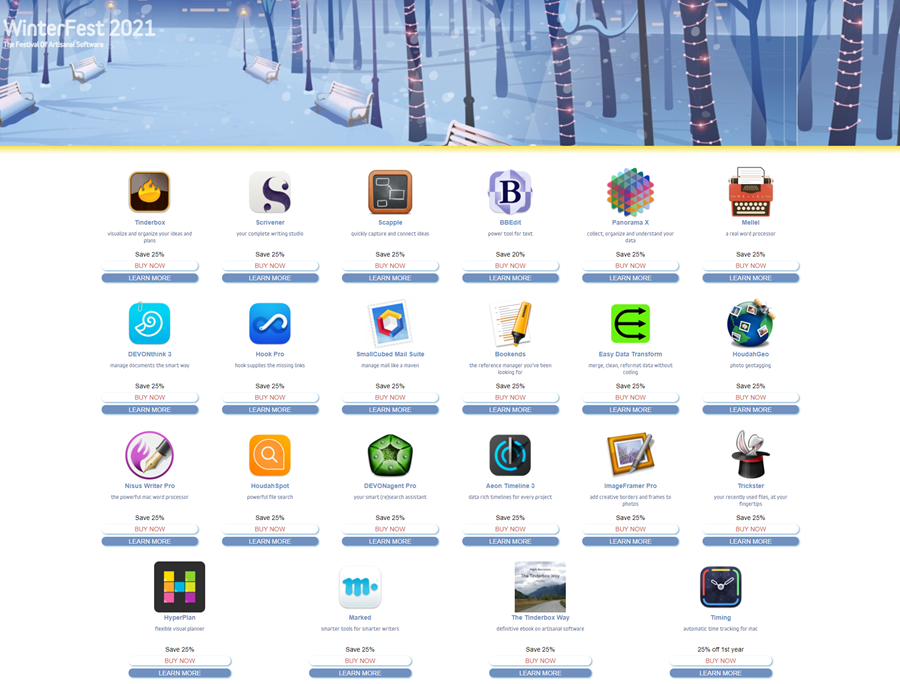
Easy Data Transform and Hyper Plan Professional edition are both on sale for 25% off at Winterfest 2021. There is also some other great products from other small vendors on sale, including Tinderbox, Scrivener and Devonthink. Some of the software is Mac only, but Easy Data Transform and Hyper Plan are available for both Mac and Windows (one license covers both). Sale ends 11th January.
This is a guest post from fellow software developer, Simon Kravis.
Few developers would choose their development platform on the merits of their respective Integrated Development Environments (IDEs) but it happens that applications developed in Windows need to be made available on the Mac platform.
There are many environments offering cross-platform (Mac, Windows and sometimes Android) functionality, but close inspection shows that they all have limitations. Visual Studio (the native Windows IDE) can produce apps which will run on a Mac using .Net Core – but only if they are command line apps on Windows. Other environments (like Xamarin) do support interfaces, but only involving simple controls like text boxes or drop-downs. There are other cross-platform IDEs (such as Qt) which offer better graphics support, but they are not cheap and the extent of their support is not evident. If you need functionality such as computer vision, there seems to be no alternative to creating a separate code base for the Mac. Once you start on this path it becomes obvious that Macs handle graphics (and interfaces) very differently from Windows.
Macs have evolved rather more than PCs over the decades: they abandoned their proprietary Mac operating system in favour of UNIX in 1999, adopting the NeXTSTEP platform created by NeXT. Apple originally used PowerPC chips, replacing them with Intel Core processors in 2006, and they are currently transitioning to RISC chips. The Mac NeXTSTEP programming language was Objective C, developed in the 1980s and this is still supported, although the modern Swift language was introduced in 2014, and the Xcode IDE appeared in 2003. Xcode is free, even for teams. It uses the Cocoa API, which is accessible from other environments. The current release (MacOS 13.0) supports both Objective-C and Swift and is also used for developing iPhone and iPad apps. Mac operating systems since Catalina (released in 2019) are 64-bit only. Xcode can only develop apps for Apple operating systems, notably iOS, which powers the iPhone. Most of the web questions and examples relate to iOS rather than MacOS. MacOS uses different frameworks from iOS, so some functions used in iOS are not available in MacOS, or have different parameters.
The Windows IDE (Visual Studio) dates from 1997, when it bundled together Visual Basic, Visual Fox Pro and Visual Source Safe and Visual C++. It has an open architecture based on plug-ins and supports 36 different programming languages, but the major ones are C#, VB.Net and C++. Visual Studio can develop apps for any platform via the .NetCore framework, but capability for non-Windows platforms is limited. The Community edition is free, and has almost all the functionality of paid versions.
Both Visual Studio and Xcode are highly complex applications. They both have graphical interface builders where controls are dragged from a library onto a form. Each application has a vocal supporters and detractors. My experience comes from about 5 years with Visual Studio developing C# applications. Before this I worked with Visual Basic for Applications in Microsoft Access, so I am well-versed in the Microsoft way of doing things.
Like most complex applications, Visual Studio and Xcode each have plenty of bugs, often producing completely unhelpful error messages. Reporting an Xcode bug through standard channels resulted in … nothing. Not even an automated message saying “Thank you for feedback. It will be used to improve future versions”. I haven’t even tried to report a Visual Studio bug, but I suspect that the much larger user base for Visual Studio will mean that workarounds are more readily available, even if the giant ship of Microsoft takes years to respond.
Moving to the Mac and Xcode for development was a shock as I found I didn’t know how to do the most basic things. String manipulation (used in most applications) in Objective C is highly verbose compared to C#. Google was invaluable for finding answers – mostly they were from Stack Overflow, but often from 10 or more years ago, sometimes from Apple Developer Forums. As Xcode has changed considerably since then, answers often had to be adjusted before they could be used. Another problem is that functionality once provided externally has since been incorporated into Cocoa, so attempts to find a current version of a component (or framework as they called in Cocoa) are often unsuccessful.
MacOS provides more native functionality than Windows. Features such as computer vision and PDF generation are included in MacOS, rather than requiring the use of 3rd party components, which may not as robust as desired, and may require a license for commercial use. However, documentation of MacOS functionality, if present at all, was rarely useful. A few times I asked questions on Stack Overflow which attracted the ire of the Mac gurus for either through having obvious (to them) answers or through not conforming to the forum guidelines (in their opinion). However, the integration of NuGet with Visual Studio provides easy access to the massive number of 3rd party libraries available for .Net on Windows.
The model-view-controller paradigm used on the Mac took some getting used to, as did the design of the main Xcode screen. Sometimes a useful display would disappear and I had difficulty in finding it how to bring it back. I often had to resort to retrieving earlier versions from the excellent Time Machine backup. Form design is similar on both platforms – dragging and dropping components from a library. Both Xcode and Visual Studio have bugs, as would be expected for such complex apps. Events from components are generated automatically in Windows, but have to be defined on the Mac (as Actions). References to the component you’ve added also need to be defined on the Mac (as Outlets) and are not a property of the component, whereas on Windows they are.
The Xcode environment provides only basic facilities from scratch: if you need to do something more sophisticated you’ll have to Google around to find out how. Once you know – it’s easy, but the learning curve for Xcode is much higher than for Visual Studio.
Rather than starting from scratch with the Mac version of my Caption Pro app, which uses local computer vision functionality to detect multiple photos, changes image dimensions and adds text to images, I found an existing open-source project on GitHub with similar basic functionality. This dated from 7 years ago and used Objective-C, so that was the language I opted for. An immediate handicap was that many of the answers I found to my questions used Swift in their example code, which is not interconvertible with Objective-C in the way that C# and VB.Net are. iOS applications for the iPhone (which are most common) use different frameworks from Mac apps, and routines in them sometimes have completely different syntax.
The user interfaces for the Mac and Windows versions look quite different, as shown below. There are some basic differences – menus appear separately to the application window on the Mac and are locked to the top of the screen, whereas Windows menus are part of the application screen. Toolbars offer access to common functionality on the Mac. Differences also arise from the fact the Mac application was adapted from existing code rather than created from scratch.
Figure 1 Windows App main screen
Figure 2 Mac App main screen
Open-source examples (often from GitHub) are useful, but rarely work out-of-the- box. Sometimes the modifications need are minor – like defining the development team- but sometimes it’s not possible to get them to build in a current version of Xcode.
Debugging on Xcode is frustrating – the call stack frequently contains assembler (which is perhaps why app performance tends to be better on Macs), and the debug variables window does not list all relevant variable values. Variable types may not be correct – Boolean values may appear as dates, and sometimes variables cannot even be evaluated by po (print out) statements. Printing out structure variables may show nothing. Despite the generally superior performance of Mac apps, building apps in Xcode appears to be much slower than in Visual Studio on similar vintage machines, and after code stops at a breakpoint, it may take a long time before the variables window is filled. Deployment of Mac apps can still be done on an ad-hoc basis, but you have to register as an Apple Developer to avoid blockages in installation arising from being an ‘untrusted source’. Bypassing these blockages is more than a matter of clicking “Install anyway” so it’s hard to avoid forking out US$100 per year for registration. Windows has similar blockages, which can be bypassed with a code-signing certificate. These certificates are available from many vendors, and are slightly cheaper than Apple developer registration, but the process of obtaining one may be very involved.
Ad-hoc deployment is somewhat easier on the Mac than on Windows, but the method of doing it via Archive generation is anything but obvious. Mac applications are actually disk images and applications keep all of relevant files in a folder. This makes uninstallation a matter of dragging the application icon into the recycle bin, a far simpler process than on Windows. dmg files are not recognized by IIS web servers (and may not be by Apache either), so unless the file type is registered, download from a web site will not be possible.
Apple pioneered the App Store for iPhones (it is the only way in which iPhone apps can be installed) and Mac apps can also be put there. Apple takes a commission of 30% (or 15% if you are a small company) and they review all apps before adding them. Passing the review process may be a lngthy process, as not all problems are detected in a review cycle. Fixing these issues and resubmitting may result in further problems coming to light. The review process may also be somewhat arbitrary. One App Store app presented an interface in German by default. English was available as Preferences option, but only after guessing where the Preferences option was located. App Store apps operate within a sandbox, which places restrictions on filesystem operations. Whether App Store deployment makes economic sense depends on the nature of the app, its market and price structure. Its advantages are that it targets the 16% of desktop users who use Macs, and streamlines installation (and payment, if applicable). The App Store supports ‘freemium’ pricing, where additional features are made available to paying users, but apps with free trial periods are shown as being free but with ‘in-app purchases’, which annoys some users.
Windows deployment can use .msi files, which have been around for decades, but are not easily installed by non-admin users. Self-extracting executables are more tractable, but 3rd party tools have to be used to create them. Windows 10 introduced Universal Windows Programs, which are easier to install and can be placed in the Microsoft Store, which operates in a similar way to the Apple App store, but for Windows desktops and tablets.
A key question which is very difficult to answer is “How long will it take me to convert my Windows app to run on a Mac?” Factors affecting this are app complexity, functionality and programmer skill. The time between starting work on the Mac app and first deploying it on the company web site was about 3 months, but the amount of time spent on the project each day varied between zero and 3 or 4 hours. If you are a paid resource, then the cost of a cross-platform IDE may be justified, but the requirement for local computer vision functionality added a great deal of complexity to my requirements, which is one reason why I opted for a separate code base. Substantial evaluation would be required before deciding if a cross-platform environment could support any required functionality.
Simon Kravis runs Aleka Consulting, a small software and consultancy company in Canberra, Australia specializing in information management and offering a number of software products. He has mainly developed scientific and engineering programs, starting in the era of paper tape.
Dark themes are now available for Windows 10 and Mac and it is increasingly expected that desktop applications will offer a dark theme. Previously Qt support for dark themes was patchy. But I am happy to say that it now seems to work fine with Qt 5.12.2, and I have added dark themes to both Windows and Mac versions of my Easy Data Transform and Hyper Plan applications.
Easy Data Transform for Mac with a dark theme:
Easy Data Transform for Windows with a dark theme:
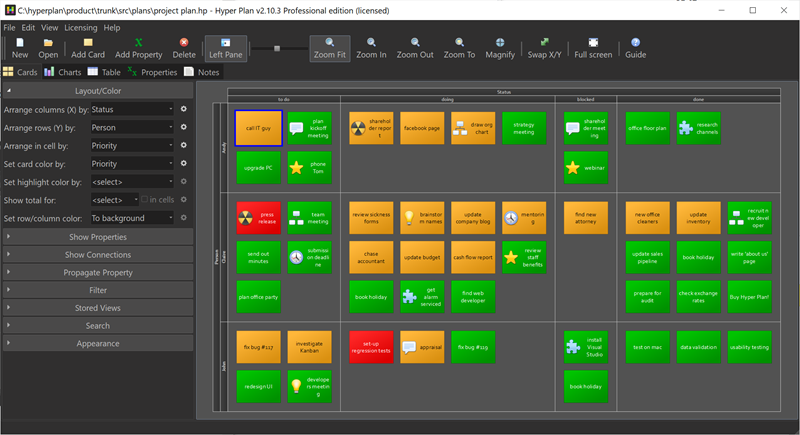
Hyper Plan for Mac with a dark theme:
Hyper Plan for Windows with a dark theme:
I haven’t decided yet whether to add a dark theme to PerfectTablePlan.
Adding dark themes was a fair amount of work. But a lot of that was scouring forums to work out how to integrate with macOS and Windows. Hopefully this article will mean you don’t have to duplicate that work.
Dark themes work a bit differently on Windows and Mac. On Windows changing the UI theme to dark won’t directly affect your Qt application. But you can use an application stylesheet to set the appearance. On Mac changing the UI theme to dark will automatically change your application palette, unless you explicitly block this in your Info.plist file (see below). On both platforms you will need to change any icons you have set to the appropriate light/dark version when the theme changes. Some of this may change in future as dark themes are more closely integrated into Qt on Windows and Mac.
macOS
You can add the following helper functions to a .mm (Objective-C) file:
The macSetToLightTheme() and macSetToDarkTheme() are useful if you want to give the user the option to ignore the OS theme. Call macSetToAutoTheme() to set it back to the default.
Currently there seems to be no way to conect to a signal or event that shows the theme has changed in Windows. So I connected to a signal from a QTimer that fires every 5 seconds to check windowsIsInDarkTheme().
Icons
When the theme changes you potentially need to update any icons you have set, e.g. for the toolbar.
In a light theme you can usually set the active icons and let Qt calculate the corresponding disabled icons. This doesn’t work for a dark theme as you want the disabled icons to be darker than the enabled icons, rather than lighter. So you can either calculate the disabled icons programmatically or you can provide a set of disabled icons as well. I opted for the former.
Assuming your icons are set up as resources under :/icons/dark and :/icons/light you can do something like this:
QString getResourceName( const QString& iconName, bool dark )
{
    return QString( ":/icons/%1/%2" ).arg( dark ? "dark" : "light" ).arg( iconName );
}

QPixmap getPixmapResource( const QString& iconName, bool dark )
{
    QString resourceName = getResourceName( iconName, dark );
    QPixmap pixmap = QPixmap( resourceName );
    Q_ASSERT( !pixmap.isNull() );
    return pixmap;
}

QIcon getIconResource( const QString& iconName, bool dark )
{
    QIcon icon;
    QPixmap pixmap = getPixmapResource( iconName, dark );
    icon.addPixmap( pixmap );
    if ( dark )
    {
        // automatic disabled icon is no good for dark
        // paint transparent black to get disabled look
        QPainter p( &pixmap );
        p.fillRect( pixmap.rect(), QColor( 48, 47, 47, 128 ) );
        icon.addPixmap( pixmap, QIcon::Disabled );
    }
    return icon;
}
Then you can reset the icon for the appropriate theme with:
Apple is switching the processor architecture of it’s Macs. Again (I transitioned PerfectTablePlan from PowerPC to Intel some hears ago). This time to their own M1 ARM chips. Reports so far have been very positive about speed and battery life of the new processors. Obviously most current Mac software has been written for Intel Macs, so they are using the Rosetta2 emulation layer to run apps compiled for Intel Macs on the ARM chips. I’m not sure how much of a performance hit this causes, but clearly it would be better to run native ARM binaries on an ARM machine. Also Apple, being Apple, want to move everyone to ARM as quickly as possible. Tough luck if you just spent big bucks on a shiny new Intel Mac.
One of my customers emailed me that the latest version of my Hyper Plan visual planner, built with Qt 5.13.1, didn’t run on an new M1 Mac. I don’t currently have an M1 Mac to test it on. But my Easy Data Transform software , built with Qt 5.15.2, apparently works fine on an M1 Mac. So I recompiled Hyper Plan using Qt 5.15.2, and was told it now works. I have found a couple of minor differences in behaviour between Qt 5.13.1 and 5.15.2, but they are too obscure to go into here. Some Qt apps may still have issues on ARM.
Currently Qt is only available as Intel binaries. Efforts are in progress to be able to build Qt as M1 (ARM) binaries. When that is complete it should be possible to ship Qt applications as a ‘fat binary’ with both Intel and ARM executables, as I did with the PowerPC to Intel transition. I’m not sure if this is going to be supported on Qt 5 and 6 or just Qt 6.
** Update Dec-2021 **
Qt 6.2 supports building M1 ARM and Intel binaries. There is no official support for M1 Arm binaries for Qt 5.
It is always a bit of fraught process upgrading a computer OS, especially for a development machine with loads of tools and libraries installed. So I try to do it as infrequently as I can get away with. On Windows I generally buy a new PC rather than upgrade OS. However glitches had been reported in Easy Data Transform on macOS 11.0 (Big Sur) and I wasn’t ready to abandon my 2017 iMac, so I decided to bite the bullet and upgrade it from macOS 10.13 to 11.0.
The initial upgrade of OS was straightforward enough. But when I tried to run Qt Creator the CPU shot to 99% and stayed there, making the machine unusable. A glance at Activity Monitor showed that several XCode related processes were going crazy. After a bit a Googling I managed to find this magic incantation to type into the terminal on a forum post:
Annoyingly, I had to buy an upgrade of SnagIt as the 2018 version doesn’t work on Big Sur. Even more annoyingly the upgrade costs nearly as much as a new licence, which feels predatory.
The Subversion command line no longer worked from the terminal, but that was easily fixed by adding /Applications/XCode.app/Developer/usr/bin to PATH in my .profile.
So far I haven’t been able to get the following to work:
XCode
Hammer4Mac
XCode 10.1 falls over if I try to start it. It says that it requires additional components and then fails to install them. I may upgrade XCode at some point. But I only use the compiler from the command line via QtCreator, so it doesn’t really matter at present.
Hammer4Mac is a static website builder I use to build the PerfectTablePlan website and a couple of other mini sites. I upgraded to the latest version. It starts, but returns ‘Build failed’ for all 3 websites. No clue as to why. I Tweeted the creator, but got no reply. It appears to be abandonware. If so they should really take down the Hammer4Mac website. I guess I will use it from my macOS 10.14 laptop and then eventually do the tedious job of porting those websites to Jekyll.
Hopefully I won’t have to do another major upgrade of macOS any time soon (I may buy a new Mac next time).
Apple now wants you to ‘notarize’ your software. This is a process where you upload your software to Apple’s server so it can be scanned and certified malware free. This will probably become compulsory at some point, even (especially?) if your software isn’t in the Apple app store. Apple says:
Give users even more confidence in your software by submitting it to Apple to be notarized. The service automatically scans your Developer ID-signed software and performs security checks. When it’s ready to export for distribution, a ticket is attached to your software to let Gatekeeper know it’s been notarized.
…
When users on macOS Mojave first open a notarized app, installer package, or disk image, they’ll see a more streamlined Gatekeeper dialog and have confidence that it is not known malware.
…
Note that in an upcoming release of macOS, Gatekeeper will require Developer ID signed software to be notarized by Apple.
Documentation on notarization is a bit thin on the ground, especially if you want to notarize software that wasn’t built using XCode (I build my software using QtCreator). So I am writing up my experiences here.
First you need to ensure you have macOS 10.14 and XCode 10 installed (with command line tools) and you need a current Apple developer account.
Codesign your app with ‘hardened runtime’ using --options runtime :
A ‘hardened runtime’ limits the data and resourced an application can access. I’m not sure what the exact ramification of this are. But it doesn’t seem to have restrict my software from doing anything it could do previously.
You can check the signing with:
codesign --verify --verbose=4 <app file>
E.g.:
codesign --verify --verbose=4 myApp.app
Now package your app into a .dmg (e.g. using DropDMG). Then upload the .dmg to Apple’s servers:
You will be prompted for your Apple developer password (or you can include it on the command line).
You now have to wait a few minutes. If the upload is successful “No errors uploading ” will be shown and a unique ID will be returned. You then have to use this to request your upload be scanned:
You will be prompted for your Apple developer password (or you can include it on the command line).
Hopefully you will see “Status Message: Package Approved”. If the notarization fails, you should be sent a link to an online log file describing the issue. If the notarization completes successfully you need to ‘staple’ the results to your .dmg:
xcrun stapler staple -v <dmg file>
E.g.:
xcrun stapler staple -v myApp.dmg
The stapler outputs a log including some odd phrases. Mine included: “Humanity must endure”, “Let’s see how that works out. “, “Adding 1 blobs to superblob. What about Blob?” and “Enjoy”. Weird. Hopefully it will end with “The staple and validate action worked!”.
Finally you can unpack your .dmg into a .app and verify it with:
spctl -a -v <app file>
E.g.
spctl -a -v /Applications/myApp.app
On macOS 10.14 (but not earlier OSs) it should say “source=Notarized Developer ID”. Your software should now run on 10.14 without a warning dialog. Congratulations!
It all seems rather clumsy. As you have to wait asynchronously for the unique ID to be returned from step 1 before you can complete step 2, it is not easy to fully automate in a script. This is a major pain the arse. If anyone works out a way to automate it the whole process, please let me know.
Here are some links to the various posts that I gleaned this information from: