My main development PC is now 5 years old and the end of life for Windows 10 is looming. I might be upgrade it to Windows 11 (there is apparently a BIOS hack if your chip doesn’t have the required TPM module), but it is quite crufty from 5 years of daily use. And it recently crashed and spent 20 minutes doing a Windows spontaneous repair, which is not very confidence inspriring. Plus the thought of a faster processor, more memory and a bigger SSD is always alluring. Time for a spanky new Windows 11 PC.
I ordered a PC to my own spec from pcspecialist.co.uk using their online configurator. I have used them a few times previously and have been suitably impressed with the service.
The new PC has:
Windows 11 Home
AMD Ryzen 9 9900X 12-Core processor
NVidia 3050 graphics card
64 GB DDR5 RAM
4 TB Samsung PRO M.2 SSD
2 x Seagate Barracuda 4TB HDDs
Corsair Gold Ultra Quiet 650W power supply
Reliability in the key issue for me, so I won’t be messing around with overclocking or other tweaks.
I’ve had a power supply blow up and take out the motherboard before, so I went for a branded power supply.
I didn’t see any real need for Windows 11Pro.
I wanted a quiet case that would sit under my desk, rather than the bling LED disco cases offered by PC Specialist. Or, even worse, a white case (god no). So I ordered a black mid size Fractal Design Define 7 case and had it delivered to them for the build.
The finished PC turned up after a couple of weeks. They have did a nice job, with some neat cabling.
Now it is just the tedious job of setting it all up. Windows offered to copy across the settings from my previous machine, but I wanted a cruft-free, clean install. So I manually installed everything from scratch:
Where possible I tried to download software direct from the manufacturers website. In a few cases where I didn’t want to pay to upgrade, and the old version wasn’t available, I used old downloads that I had kept.
I needed Microsoft Visual Studio 2019, rather than 2022, due to compatibility issues with Qt. The 2019 version is not easy to find online, but is currently still available.
The Easy Data Transform compile time has gone from 51 seconds, on the old PC, to 26 seconds, on the new PC.
An Easy Data Transform benchmark that inputs, joins, sorts and outputs a million row dataset, has gone from 14.3 seconds , on the old PC, to 10.3 seconds, on the new PC.
So a significant speed improvement.
Currently I have 3 PCs and 1 Mac, 3 monitors, 4 mice and 4 keyboards. It is a mess. I have tried a physical KVM switch in the past, but it felt very clunky. Following a tipoff from a friend, I am going to investigate www.sharemouse.com as a way to make this more manageable. Do you have a good way to manage multiple monitors, mice and keyboards? Please let me know in the comments.
I wanted to be able to read and write Excel file on Windows and Mac from my C++/Qt application, whether Excel is installed or not. I would rather commit suicide with a cheese grater, than try to write my own code to parse whatever horrific format Excel is written in. So I looked around for a library.
I ended up buying a licence for LibXL, from XLWare, back in 2019. It has been working great ever since. I now also use it in PerfectTablePlan v7.
Things to like:
Available as a library for Windows, Mac, Linux and iOS (I have only used it for Windows and Mac, so far).
Accessible from lots of languages, including: C, C++, .Net, Delphi, PHP, Python, PowerBASIC and Fortran.
Example code is available in C++, C, C# and Delphi.
Good support.
Regular updates.
Reasonable pricing.
No per-user fees.
The API is a little low-level for my taste, but I guess that is inevitable when you support C as well as C++. Reading and writing is slow compared to reading and writing the same data to/from a CSV file. But, no doubt, that is due to the limitations of the Excel file format.
I don’t have any affiliation with LibXL beyond being a paying customer, and I haven’t been asked to write this. I just wanted to give a shout-out to the developer, Dmytro, for his sterling work. Long may it continue.
I released Easy Data Transform v2 today. After no fewer than 80 (!) v1 production releases since 2019, this is the first paid upgrade.
Major improvements include:
Schema versioning, so you can automatically handle changes to the column structure of an input (e.g. additional or missing columns).
A new Verify transform so you can check a dataset has the expected values.
Currently there are 48 different verification checks you can make:
At least 1 non-empty value
Contains
Don’t allow listed values
Ends with
Integer except listed special value(s)
Is local file
Is local folder
Is lower case
Is sentence case
Is title case
Is upper case
Is valid EAN13
Is valid email
Is valid telephone number
Is valid UPC-A
Match column name
Matches regular expression
Maximum characters
Maximum number of columns
Maximum number of rows
Maximum value
Minimum characters
Minimum number of columns
Minimum number of rows
Minimum value
No blank values
No carriage returns
No currency
No digits
No double spaces
No duplicate column names
No duplicate values
No empty rows
No empty values
No gaps in values
No leading or trailing whitespace
No line feeds
No non-ASCII
No non-printable
No punctuation
No symbols
No Tab characters
No whitespace
Numeric except listed special value(s)
Only allow listed values
Require listed values
Starts with
Valid date in format
You can see any fails visually, with colour coding by severity:
Side-by-side comparison of dataset headers:
Side-by-side comparison of dataset data values:
Lots of extra matching options for the Lookup transform:
Allowing you to do exotic lookups such as:
Plus lots of other changes.
In v1 there were issues related to how column-related changes cascaded through the system. This was the hardest thing to get right, and it took a fairly big redesign to fix all the issues. As a bonus, you can now disconnect and reconnect nodes, and it remembers all the column-based options (within certain limits). These changes make Easy Data Transform feel much more robust to use, as you can now make lots of changes without worrying too much about breaking things further downstream.
Easy Data Transform now supports:
9 input formats (including various CSV variants, Excel, XML and JSON)
66 different data transforms (such as Join, Filter, Pivot, Sample and Lookup)
11 output formats (including various CSV variants, Excel, XML and JSON)
56 text encodings
This allows you to snap together a sequence of nodes like Lego, to very quickly transform or analyse your data. Unlike a code-based approach (such as R or Python) or a command line tool, it is extremely visual, with pretty-much instant feedback every time you make a change. Plus, no pesky syntax to remember.
Eating my own dogfood, using Easy Data Transform to create an email marketing campaign from various disparate data sources (mailing lists, licence key databases etc).
Easy Data Transform is all written in C++ with memory compression and reference counting, so it is fast and memory efficient and can handle multi-million row datasets with no problem.
While many of my competitors are transitioning to the web, Easy Data Transform remains a local tool for Windows and Mac. This has several major advantages:
Your sensitive data stays on your computer.
Less latency.
I don’t have to pay your compute and bandwidth costs, which means I can charge an affordable one-time fee for a perpetual licence.
I think privacy is only going to become ever more of a concern as rampaging AIs try to scrape every single piece of data they can find.
Usage-based fees for online data tools are no small matter. For a range of usage fee horror stories, such as enabling debug logging in a large production ETL pipeline resulting in $100k of extra costs in a week, see this Reddit post. Some of my customers have processed more than a billion rows in Easy Data Transform. Not bad for $99!
It has been a lot of hard work, but I am please with how far Easy Data Transform has come. I think Easy Data Transform is now a comprehensive, fast and robust tool for file-based data wrangling. If you have some data to wrangle, give it a try! It is only $99+tax ($40+tax if you are upgrading from v1) and there is a fully functional, 7 day free trial here:
I am very grateful to my customers, who have been a big help in providing feedback. This has improved the product no end. Many heads are better than one!
The next big step is going to be adding the ability to talk directly to databases, REST APIs and other data sources. I also hope at some point to add the ability to visualize data using graphs and charts. Watch this space!
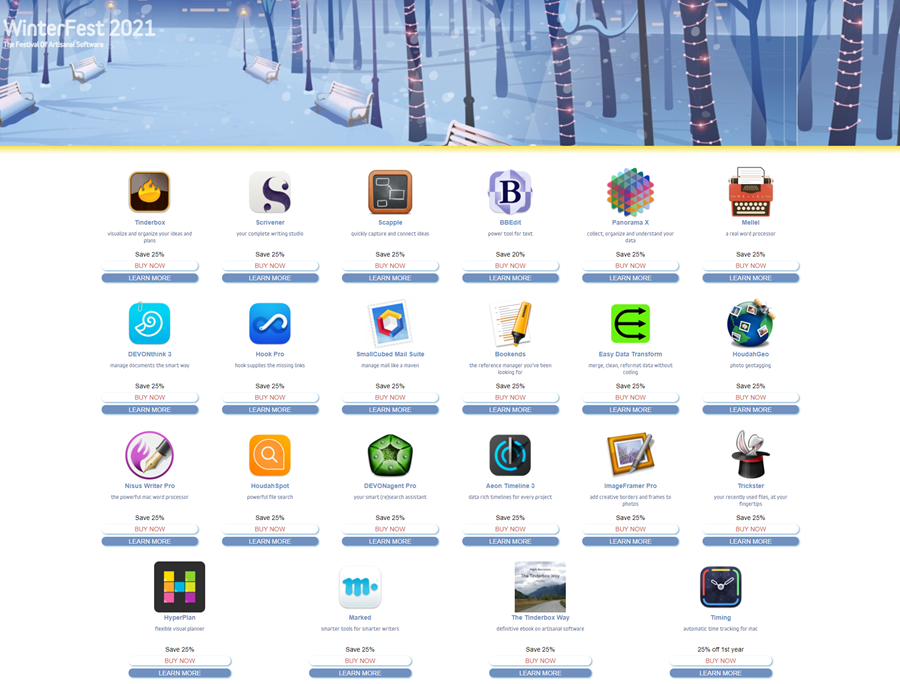
Summerfest 2023 is on. Loads of quality software for Mac and Windows from independent vendors, at a discount. This includes my own Easy Data Transform and Hyper Plan, which are on sale with a 25% discount.
This is a guest post from fellow software developer, Simon Kravis.
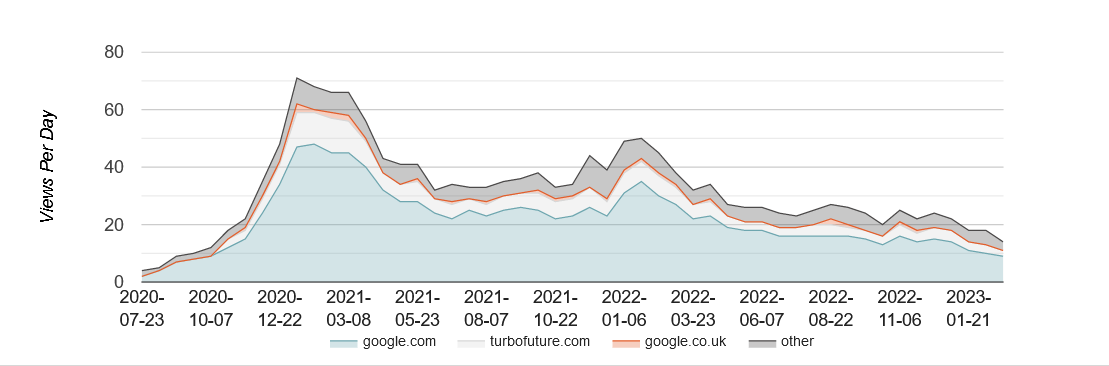
It’s sometimes said that software development is only 10% of what’s required to earn money from software and I can attest to that. Since 2018 I have been developing photo captioning and related software, more as a retirement diversion than a serious source of income (after a career mostly involved in writing scientific and engineering analysis software), in the hope that sales income would at least cover running costs. My best marketing tool has been writing reviews of the class of software that I produce, and the hosting site (Hub Pages) provides some useful analytics on how often these are accessed and for how long. Below is the graph for an article on tagging.
The decline since early 2022 is hard to explain – the article is periodically updated so the steady decline is not due to diminishing ‘freshness’ – which for Google is probably a file Modified date.
Here is another review article profile (Scanning Multiple Photos) showing a similar decline:
But another (Best Photo Captioning Software) has held up, though at a low level.
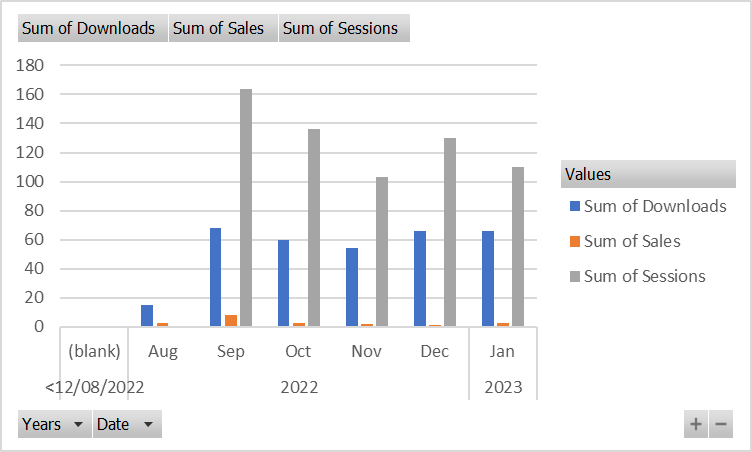
I offer digital photo captioning software (Caption Pro) on Windows and Mac platforms, and an iPhone captioning app (CaptionEdit), with the Windows version dating back to 2017. I also offer part of the functionality of Caption Pro on Windows for auto-cropping scans of multiple paper photos (ImageSplit). On Windows neither Caption Pro software downloads or sales seem to correlate with review accesses, despite about 1/3 of web site accesses coming from the review. However, downloads do show some correlation with Caption Pro web site sessions, as shown in the graph below.
Sales do not correlate with downloads, which perhaps explains why most advertising for niche products is not successful – it may increase downloads but this does not appear to increase sales. The observed proportion of downloads resulting in sales for ImageSplit and Caption Pro are 6% and 9% respectively. The lack of correlation between sales and downloads may be due to the small number of sales per month, which results in random fluctuation dominating the results.
The decision to enter the Apple “Walled Garden” of software was partly at the prompting of friends rather than a commercial evaluation. Apple Developer membership (costing ~US$100 per year) is required to prevent software being blocked from installation through being from an unknown publisher. Further costs were purchasing a fairly modern Mac on which to perform development, as the App Store will only accept software developed using recent versions of the Xcode development environment, which will only run on fairly recent hardware. The App Store takes a commission of 15% on sales, which is quite reasonable when compared to the difficulty of implementing e-commerce on Windows, where a PayPal account eases the problem of low-value foreign-currency transactions, but e-commerce plug-ins may stop working after years for no discernible reason. The review process for software acceptance into the App Store is generally fast, but seemly trivial issues can require resubmission. Features which have passed one review may be rejected in a later one. The review process is generally fast, but on one occasion took 4 weeks.
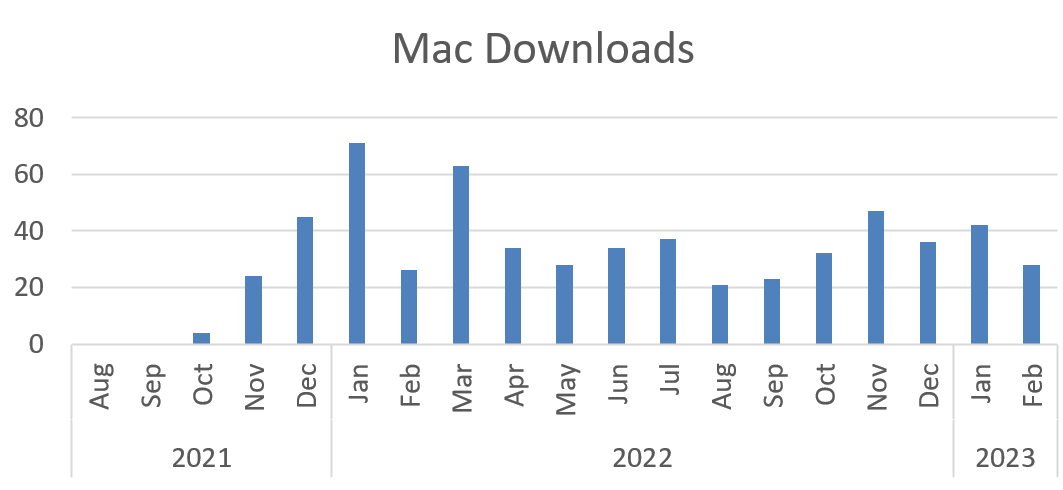
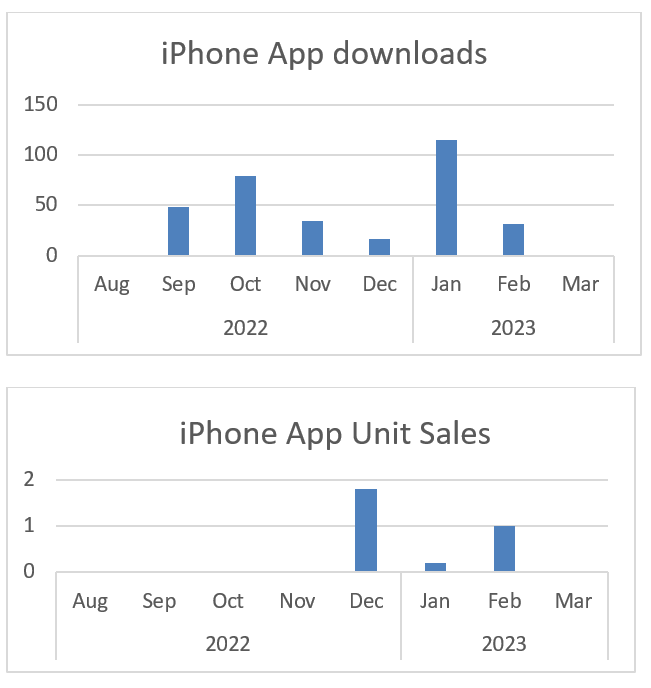
Caption Pro for Mac has been available (via the App Store) only since Sep 2021.It appears within the top 6 results for a search using “Caption Photos”, which is the source for most downloads. About 3.5% of downloads result in sales. This figure is much less than the Windows version of the same app, despite Mac users’ reputation for being more willing to pay for software. The iPhone app did not appear at all initially when searching for “Caption Photos” in the App Store. After 6 months it began appearing as result number 140, after it had 360 downloads. This poor ranking performance is probably because “Caption Photos” is a very popular keyword used by many apps, including those that only caption videos. It has had very few downloads and sales, despite Apple Search Ads and Apptimizer campaigns. The number of downloads increased dramatically during the Apptimizer campaign between Jan 24 and Feb 2 (as they were purchased) but the change in ranking from these downloads did not result in any sales, perhaps because no installs were purchased. The Apple search ads campaign (which resulted in the app being shown as an ad 1 in 50 times when the search phrase “Caption Photos” was used) did not greatly affect downloads or sales. A Facebook ad campaign to show a link to the app whenever “Genealogy” or “Genealogy Software” was searched for was also unsuccessful, and very expensive, as Facebook charges by impressions rather than clicks. Additional backlinks to the web site were purchased in September 2022 from Links Management in an attempt to improve the web site Google ranking, but this did not appear to have any effect on web traffic.
Mac and Windows users contacting me with problems have had a wide range of experience level – from completely naïve to former programmers. Most have been from the US, which reflects the geographic distribution of sales. There have many downloads to non-English speaking countries but very few sales.
Some results from the Mac and iPhone Apps are shown below:
On balance, developing for Apple platforms was not a good commercial decision, as the advantages of a mostly captive audience (completely captive in the case of the iPhone) do not seem to result in higher rates of downloads or sales. Competition for iPhone apps is so intense that niche products without massive advertising budgets are unlikely to succeed. The same is likely to apply to Android phone apps, which anecdotally have a less rigorous review process. My experience is that advertising and backlink purchase for any platform are not effective in increasing sales for niche software.
Simon Kravis runs Aleka Consulting, a small software and consultancy company in Canberra, Australia specializing in information management and offering a number of software products. He has mainly developed scientific and engineering programs, starting in the era of paper tape.
The authenticode digital certificate I bought back in 2019 expired recently, so I had to get a new certificate (you can’t renew a certificate, as such, you just need to buy a new one). A few months before the expiry I emailed KSoftware.net, who I had bought previous digital certificates from and with whom I had always had a good experience in the past. No reply. I tried a couple more times, including the personal email of Mitchell, the founder. Nothing. Someone else told me they had had similar experiences. Their recent trustpilot ratings are a horror show. And the copyright date on their website is ‘2003 – 2021’. But they were still advertising on Google Adwords. I have no idea what is happening here. If you are reading this Mitchell, I hope you are ok.
With KSoftware out of the picture I looked elsewhere. Eventually I ended up buying a new Sectigo certificate from signmycode.com. I partly chose them because they offered a 5 year certficate and the less often I have to go through the ball ache of a getting a new certificate, the better. The experience was decidely mixed.
The good:
The prices seem reasonable, compared to other options.
Support was responsive. English didn’t appear to be their first language, but it was good enough.
I got my new certificate within a few days and have had no issues with it so far. The change in certificate seems to be set off a few customer’s anti-virus software, but that was to be expected.
The mediocre:
The online guidance and documentation on the process was mediocre, at best.
I was a bit confused about whether I had to click ‘Buy now’ or ‘Renew now’. It seems this is more marketing/SEO purposes and it doesn’t matter which you click.
I had to send them a photo of me holding a government ID. This felt pretty uncomfortable, but might be something mandated by the certificate companies.
The bad:
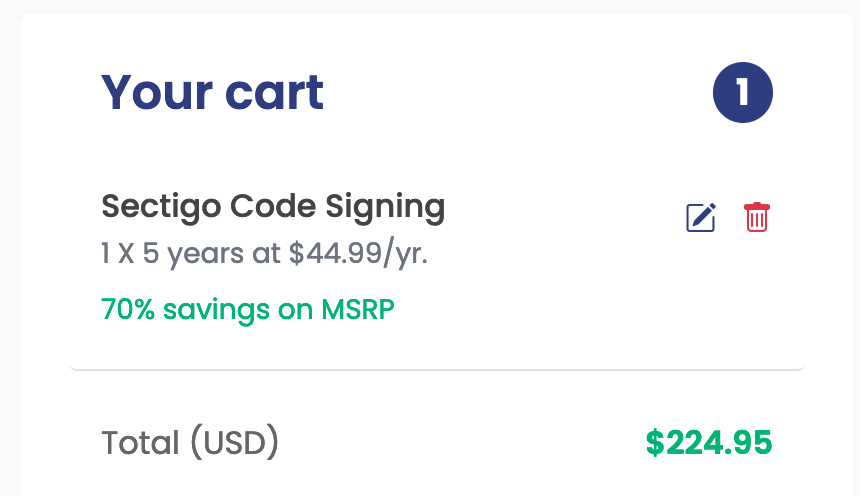
After I got my certificate I checked the expiry date and it was only 3 years. When I queried this I was rold that the ‘5 year certificate’ I thought I had bought is not a 5 year certificate. It is a 3 year certificate, then I have to apply for a new pre-paid 2 year certificate in 3 years time.
This is what you see when you click on ‘Buy now’:
When you see this, wouldn’t you expect to get a single 5 year certificate? If there was anything explaining that this was 2 separate certificates, I didn’t notice it. It certainly didn’t mention it on their home page. This feels deceptive to me.
Who knows if this company will still be there in 3 years time? I emailed them and told them I wanted to keep the new 3 year certificate and for them to refund the 2 year certificate. They said they would only refund the entire order and then I would have to start the whole process all over again. They also claimed:
“renewal validation is much more easy then buying a new certificate as most of the validation part is getting carry forward.”
Easy Data Transform and Hyper Plan Professional edition are both on sale for 25% off at Winterfest 2022. So now might be a good time to give them a try (both have free trials). There is also some other great products from other small vendors on sale, including Tinderbox, Scrivener and Devonthink. Some of the software is Mac only, but Easy Data Transform and Hyper Plan are available for both Mac and Windows (one license covers both OSs).
Easy Data Transform and Hyper Plan Professional edition are both on sale for 25% off at Summerfest 2022. So now might be a good time to give them a try (both have free trials). There is also some other great products from other small vendors on sale, including Tinderbox, Scrivener and Devonthink. Some of the software is Mac only, but Easy Data Transform and Hyper Plan are available for both Mac and Windows (one license covers both). Sale ends 12th July.
Easy Data Transform and Hyper Plan Professional edition are both on sale for 25% off at Winterfest 2021. There is also some other great products from other small vendors on sale, including Tinderbox, Scrivener and Devonthink. Some of the software is Mac only, but Easy Data Transform and Hyper Plan are available for both Mac and Windows (one license covers both). Sale ends 11th January.
This is a guest post from fellow software developer, Simon Kravis.
Few developers would choose their development platform on the merits of their respective Integrated Development Environments (IDEs) but it happens that applications developed in Windows need to be made available on the Mac platform.
There are many environments offering cross-platform (Mac, Windows and sometimes Android) functionality, but close inspection shows that they all have limitations. Visual Studio (the native Windows IDE) can produce apps which will run on a Mac using .Net Core – but only if they are command line apps on Windows. Other environments (like Xamarin) do support interfaces, but only involving simple controls like text boxes or drop-downs. There are other cross-platform IDEs (such as Qt) which offer better graphics support, but they are not cheap and the extent of their support is not evident. If you need functionality such as computer vision, there seems to be no alternative to creating a separate code base for the Mac. Once you start on this path it becomes obvious that Macs handle graphics (and interfaces) very differently from Windows.
Macs have evolved rather more than PCs over the decades: they abandoned their proprietary Mac operating system in favour of UNIX in 1999, adopting the NeXTSTEP platform created by NeXT. Apple originally used PowerPC chips, replacing them with Intel Core processors in 2006, and they are currently transitioning to RISC chips. The Mac NeXTSTEP programming language was Objective C, developed in the 1980s and this is still supported, although the modern Swift language was introduced in 2014, and the Xcode IDE appeared in 2003. Xcode is free, even for teams. It uses the Cocoa API, which is accessible from other environments. The current release (MacOS 13.0) supports both Objective-C and Swift and is also used for developing iPhone and iPad apps. Mac operating systems since Catalina (released in 2019) are 64-bit only. Xcode can only develop apps for Apple operating systems, notably iOS, which powers the iPhone. Most of the web questions and examples relate to iOS rather than MacOS. MacOS uses different frameworks from iOS, so some functions used in iOS are not available in MacOS, or have different parameters.
The Windows IDE (Visual Studio) dates from 1997, when it bundled together Visual Basic, Visual Fox Pro and Visual Source Safe and Visual C++. It has an open architecture based on plug-ins and supports 36 different programming languages, but the major ones are C#, VB.Net and C++. Visual Studio can develop apps for any platform via the .NetCore framework, but capability for non-Windows platforms is limited. The Community edition is free, and has almost all the functionality of paid versions.
Both Visual Studio and Xcode are highly complex applications. They both have graphical interface builders where controls are dragged from a library onto a form. Each application has a vocal supporters and detractors. My experience comes from about 5 years with Visual Studio developing C# applications. Before this I worked with Visual Basic for Applications in Microsoft Access, so I am well-versed in the Microsoft way of doing things.
Like most complex applications, Visual Studio and Xcode each have plenty of bugs, often producing completely unhelpful error messages. Reporting an Xcode bug through standard channels resulted in … nothing. Not even an automated message saying “Thank you for feedback. It will be used to improve future versions”. I haven’t even tried to report a Visual Studio bug, but I suspect that the much larger user base for Visual Studio will mean that workarounds are more readily available, even if the giant ship of Microsoft takes years to respond.
Moving to the Mac and Xcode for development was a shock as I found I didn’t know how to do the most basic things. String manipulation (used in most applications) in Objective C is highly verbose compared to C#. Google was invaluable for finding answers – mostly they were from Stack Overflow, but often from 10 or more years ago, sometimes from Apple Developer Forums. As Xcode has changed considerably since then, answers often had to be adjusted before they could be used. Another problem is that functionality once provided externally has since been incorporated into Cocoa, so attempts to find a current version of a component (or framework as they called in Cocoa) are often unsuccessful.
MacOS provides more native functionality than Windows. Features such as computer vision and PDF generation are included in MacOS, rather than requiring the use of 3rd party components, which may not as robust as desired, and may require a license for commercial use. However, documentation of MacOS functionality, if present at all, was rarely useful. A few times I asked questions on Stack Overflow which attracted the ire of the Mac gurus for either through having obvious (to them) answers or through not conforming to the forum guidelines (in their opinion). However, the integration of NuGet with Visual Studio provides easy access to the massive number of 3rd party libraries available for .Net on Windows.
The model-view-controller paradigm used on the Mac took some getting used to, as did the design of the main Xcode screen. Sometimes a useful display would disappear and I had difficulty in finding it how to bring it back. I often had to resort to retrieving earlier versions from the excellent Time Machine backup. Form design is similar on both platforms – dragging and dropping components from a library. Both Xcode and Visual Studio have bugs, as would be expected for such complex apps. Events from components are generated automatically in Windows, but have to be defined on the Mac (as Actions). References to the component you’ve added also need to be defined on the Mac (as Outlets) and are not a property of the component, whereas on Windows they are.
The Xcode environment provides only basic facilities from scratch: if you need to do something more sophisticated you’ll have to Google around to find out how. Once you know – it’s easy, but the learning curve for Xcode is much higher than for Visual Studio.
Rather than starting from scratch with the Mac version of my Caption Pro app, which uses local computer vision functionality to detect multiple photos, changes image dimensions and adds text to images, I found an existing open-source project on GitHub with similar basic functionality. This dated from 7 years ago and used Objective-C, so that was the language I opted for. An immediate handicap was that many of the answers I found to my questions used Swift in their example code, which is not interconvertible with Objective-C in the way that C# and VB.Net are. iOS applications for the iPhone (which are most common) use different frameworks from Mac apps, and routines in them sometimes have completely different syntax.
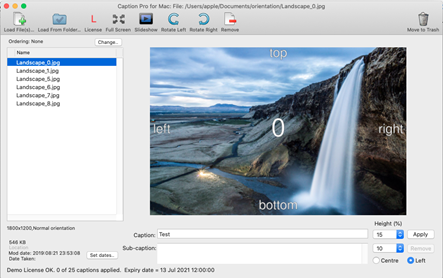
The user interfaces for the Mac and Windows versions look quite different, as shown below. There are some basic differences – menus appear separately to the application window on the Mac and are locked to the top of the screen, whereas Windows menus are part of the application screen. Toolbars offer access to common functionality on the Mac. Differences also arise from the fact the Mac application was adapted from existing code rather than created from scratch.
Figure 1 Windows App main screen
Figure 2 Mac App main screen
Open-source examples (often from GitHub) are useful, but rarely work out-of-the- box. Sometimes the modifications need are minor – like defining the development team- but sometimes it’s not possible to get them to build in a current version of Xcode.
Debugging on Xcode is frustrating – the call stack frequently contains assembler (which is perhaps why app performance tends to be better on Macs), and the debug variables window does not list all relevant variable values. Variable types may not be correct – Boolean values may appear as dates, and sometimes variables cannot even be evaluated by po (print out) statements. Printing out structure variables may show nothing. Despite the generally superior performance of Mac apps, building apps in Xcode appears to be much slower than in Visual Studio on similar vintage machines, and after code stops at a breakpoint, it may take a long time before the variables window is filled. Deployment of Mac apps can still be done on an ad-hoc basis, but you have to register as an Apple Developer to avoid blockages in installation arising from being an ‘untrusted source’. Bypassing these blockages is more than a matter of clicking “Install anyway” so it’s hard to avoid forking out US$100 per year for registration. Windows has similar blockages, which can be bypassed with a code-signing certificate. These certificates are available from many vendors, and are slightly cheaper than Apple developer registration, but the process of obtaining one may be very involved.
Ad-hoc deployment is somewhat easier on the Mac than on Windows, but the method of doing it via Archive generation is anything but obvious. Mac applications are actually disk images and applications keep all of relevant files in a folder. This makes uninstallation a matter of dragging the application icon into the recycle bin, a far simpler process than on Windows. dmg files are not recognized by IIS web servers (and may not be by Apache either), so unless the file type is registered, download from a web site will not be possible.
Apple pioneered the App Store for iPhones (it is the only way in which iPhone apps can be installed) and Mac apps can also be put there. Apple takes a commission of 30% (or 15% if you are a small company) and they review all apps before adding them. Passing the review process may be a lngthy process, as not all problems are detected in a review cycle. Fixing these issues and resubmitting may result in further problems coming to light. The review process may also be somewhat arbitrary. One App Store app presented an interface in German by default. English was available as Preferences option, but only after guessing where the Preferences option was located. App Store apps operate within a sandbox, which places restrictions on filesystem operations. Whether App Store deployment makes economic sense depends on the nature of the app, its market and price structure. Its advantages are that it targets the 16% of desktop users who use Macs, and streamlines installation (and payment, if applicable). The App Store supports ‘freemium’ pricing, where additional features are made available to paying users, but apps with free trial periods are shown as being free but with ‘in-app purchases’, which annoys some users.
Windows deployment can use .msi files, which have been around for decades, but are not easily installed by non-admin users. Self-extracting executables are more tractable, but 3rd party tools have to be used to create them. Windows 10 introduced Universal Windows Programs, which are easier to install and can be placed in the Microsoft Store, which operates in a similar way to the Apple App store, but for Windows desktops and tablets.
A key question which is very difficult to answer is “How long will it take me to convert my Windows app to run on a Mac?” Factors affecting this are app complexity, functionality and programmer skill. The time between starting work on the Mac app and first deploying it on the company web site was about 3 months, but the amount of time spent on the project each day varied between zero and 3 or 4 hours. If you are a paid resource, then the cost of a cross-platform IDE may be justified, but the requirement for local computer vision functionality added a great deal of complexity to my requirements, which is one reason why I opted for a separate code base. Substantial evaluation would be required before deciding if a cross-platform environment could support any required functionality.
Simon Kravis runs Aleka Consulting, a small software and consultancy company in Canberra, Australia specializing in information management and offering a number of software products. He has mainly developed scientific and engineering programs, starting in the era of paper tape.