The application icon for my data wrangling software looks like this on a Mac up to macOS 15.x:
However, Apple has once again nuked everything from orbit. Now it looks like this in macOS 26 Tahoe when the application is inactive or if you choose any Icon & widget style apart from Default:
Thanks Apple. It is such a joy to develop for Mac.
With some help from a designer and hours of going around in circles, I have finally managed to fix things to support the new ‘liquid glass’ look. This is how it should look in the next release, depending on the setting in Appearance>Icon & widget style:
Default
Dark
Clear/Light
Clear/Dark
Tinted
I’m not convinced it is an improvement in terms of usability. But, at least my app icon doesn’t look like shit.
What you need to know
The new macOS 26 icon format is .icon. It is a folder full of various resources and is totally different to the old .icns format.
The .icon file can be created by Apple Icon Composer. I used a freelancer on Fiverr who did a good job of converting my existing vector artwork and was very cheap. The .icon file should contain a maximum of 4 groups (which seem to be like layers) other it won’t compile to a resource properly.
Note that macOS hide the extension of .icon folders by default, which was a source of some confusion.
The .icon file then has to be processed into an Assets.car file using actool. For example:
xcrun actool application.icon --compile ./icons/macosx --output-format human-readable-text --notices --warnings --errors --output-partial-info-plist temp.plist --app-icon Icon --include-all-app-icons --enable-on-demand-resources NO --development-region en --target-device mac --minimum-deployment-target 26.0 --platform macosx
You will need to change the bold parts above, as appropriate.
I had to update my Mac laptop to macOS 26, Xcode 26 and the macOS 26 SDK for the above to work.
You can check the Assets.car file using assetutil to create a .json file listing the contents:
You will need to change the bold part above, as appropriate. I believe the string value if based on the file stem of the original .icon file. But I’m not 100% sure about that. Look at the .json file produced by assetutil for clues. Mine contained this:
The temp.plist file generated by actool is apparently supposed to give you a .plist file that refers to the icon resource. It didn’t and was completely useless.
Then place both Assets.car and your old .icns file in the Resource folder of your application (before you sign it). That way it should look ok on both macOS 26 and earlier OSes.
If you develop using XCode, it will probably do some of the above for you. I develop in C++/Qt using Qt Creator, so I had to do it all manually.
I was able to generate the Assets.car on macOS 26 and then incorporate it into the build on my macOS 12 development machine.
I hope the above saves someone a few hours. Now I need to repeat the process for PerfectTablePlan.
You might also find this post useful (where I got some of the information):
My main development PC is now 5 years old and the end of life for Windows 10 is looming. I might be upgrade it to Windows 11 (there is apparently a BIOS hack if your chip doesn’t have the required TPM module), but it is quite crufty from 5 years of daily use. And it recently crashed and spent 20 minutes doing a Windows spontaneous repair, which is not very confidence inspriring. Plus the thought of a faster processor, more memory and a bigger SSD is always alluring. Time for a spanky new Windows 11 PC.
I ordered a PC to my own spec from pcspecialist.co.uk using their online configurator. I have used them a few times previously and have been suitably impressed with the service.
The new PC has:
Windows 11 Home
AMD Ryzen 9 9900X 12-Core processor
NVidia 3050 graphics card
64 GB DDR5 RAM
4 TB Samsung PRO M.2 SSD
2 x Seagate Barracuda 4TB HDDs
Corsair Gold Ultra Quiet 650W power supply
Reliability in the key issue for me, so I won’t be messing around with overclocking or other tweaks.
I’ve had a power supply blow up and take out the motherboard before, so I went for a branded power supply.
I didn’t see any real need for Windows 11Pro.
I wanted a quiet case that would sit under my desk, rather than the bling LED disco cases offered by PC Specialist. Or, even worse, a white case (god no). So I ordered a black mid size Fractal Design Define 7 case and had it delivered to them for the build.
The finished PC turned up after a couple of weeks. They have did a nice job, with some neat cabling.
Now it is just the tedious job of setting it all up. Windows offered to copy across the settings from my previous machine, but I wanted a cruft-free, clean install. So I manually installed everything from scratch:
Where possible I tried to download software direct from the manufacturers website. In a few cases where I didn’t want to pay to upgrade, and the old version wasn’t available, I used old downloads that I had kept.
I needed Microsoft Visual Studio 2019, rather than 2022, due to compatibility issues with Qt. The 2019 version is not easy to find online, but is currently still available.
The Easy Data Transform compile time has gone from 51 seconds, on the old PC, to 26 seconds, on the new PC.
An Easy Data Transform benchmark that inputs, joins, sorts and outputs a million row dataset, has gone from 14.3 seconds , on the old PC, to 10.3 seconds, on the new PC.
So a significant speed improvement.
Currently I have 3 PCs and 1 Mac, 3 monitors, 4 mice and 4 keyboards. It is a mess. I have tried a physical KVM switch in the past, but it felt very clunky. Following a tipoff from a friend, I am going to investigate www.sharemouse.com as a way to make this more manageable. Do you have a good way to manage multiple monitors, mice and keyboards? Please let me know in the comments.
I wanted to be able to read and write Excel file on Windows and Mac from my C++/Qt application, whether Excel is installed or not. I would rather commit suicide with a cheese grater, than try to write my own code to parse whatever horrific format Excel is written in. So I looked around for a library.
I ended up buying a licence for LibXL, from XLWare, back in 2019. It has been working great ever since. I now also use it in PerfectTablePlan v7.
Things to like:
Available as a library for Windows, Mac, Linux and iOS (I have only used it for Windows and Mac, so far).
Accessible from lots of languages, including: C, C++, .Net, Delphi, PHP, Python, PowerBASIC and Fortran.
Example code is available in C++, C, C# and Delphi.
Good support.
Regular updates.
Reasonable pricing.
No per-user fees.
The API is a little low-level for my taste, but I guess that is inevitable when you support C as well as C++. Reading and writing is slow compared to reading and writing the same data to/from a CSV file. But, no doubt, that is due to the limitations of the Excel file format.
I don’t have any affiliation with LibXL beyond being a paying customer, and I haven’t been asked to write this. I just wanted to give a shout-out to the developer, Dmytro, for his sterling work. Long may it continue.
This sounds like a question a programmer might ask after one medicinal cigarette too many. The computer science equivalent of “what is the sounds of one hand clapping?”. But it is a question I have to decide the answer to.
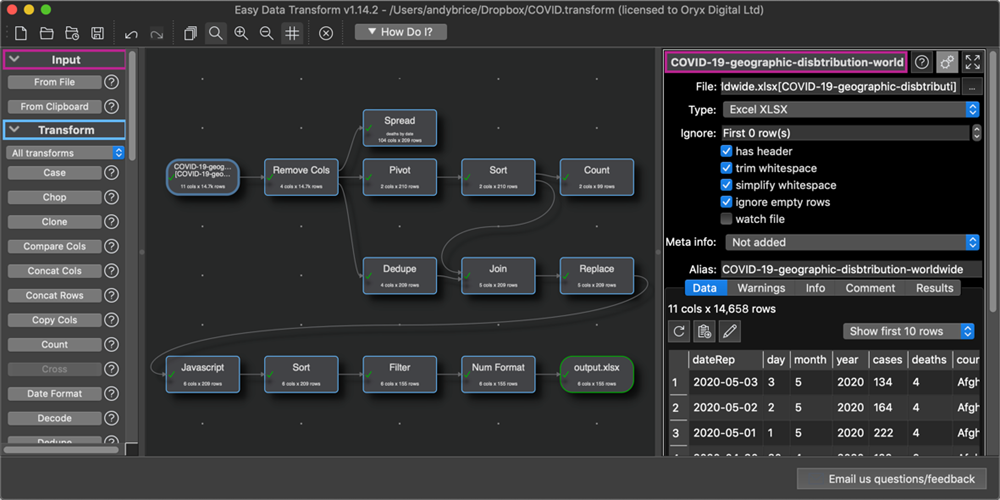
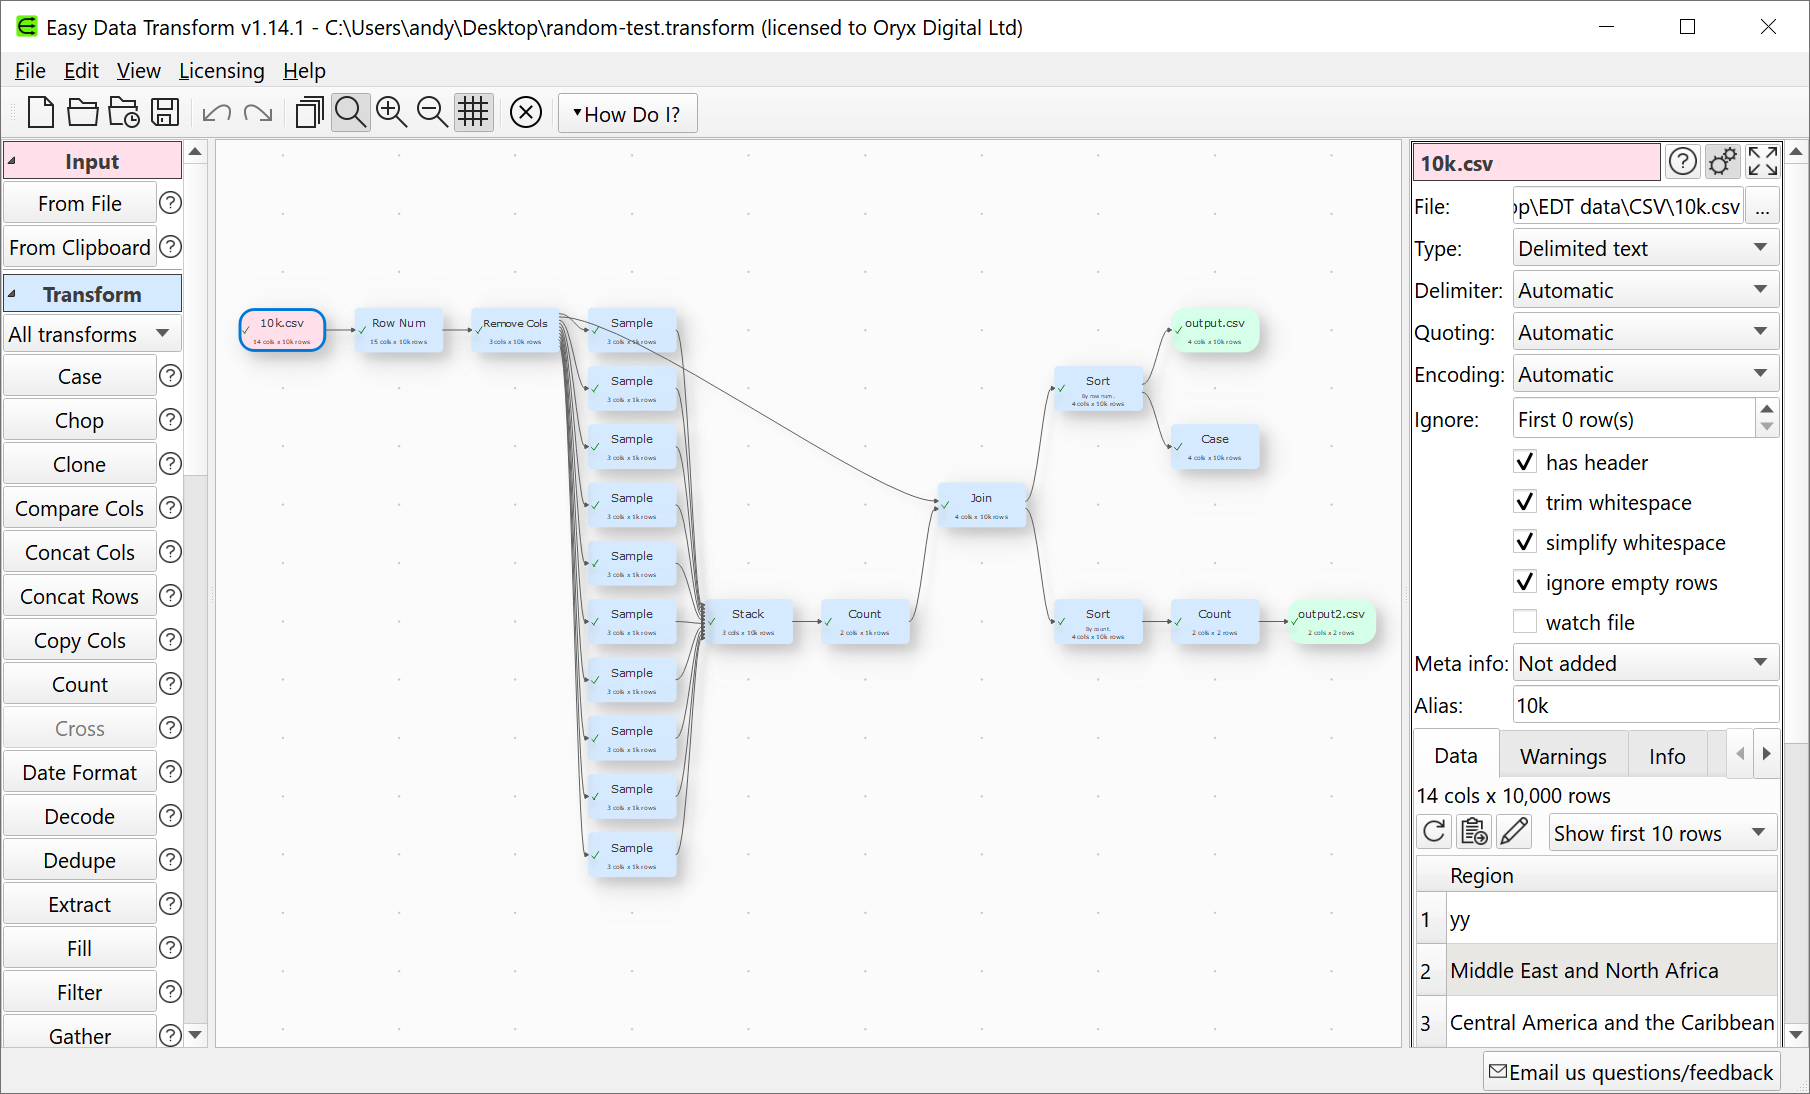
I am adding indexOf() and lastIndexOf() operations to the Calculate transform of my data wrangling (ETL) software (Easy Data Transform). This will allow users to find the offset of one string inside another, counting from the start or the end of the string. Easy Data Transform is written in C++ and uses the Qt QString class for strings. There are indexOf() and lastIndexOf() methods for QString, so I thought this would be an easy job to wrap that functionality. Maybe 15 minutes to program it, write a test case and document it.
Obviously it wasn’t that easy, otherwise I couldn’t be writing this blog post.
First of all, what is the index of “a” in “abc”? 0, obviously. QString( “abc” ).indexOf( “a” ) returns 0. Duh. Well only if you are a (non-Fortran) programmer. Ask a non-programmer (such as my wife) and they will say: 1, obviously. It is the first character. Duh. Excel FIND( “a”, “abc” ) returns 1.
Ok, most of my customers, aren’t programmers. I can use 1 based indexing.
But then things get more tricky.
What is the index of an empty string in “abc”? 1 maybe, using 1-based indexing or maybe empty is not a valid value to pass.
What is the index of an empty string in an empty string? Hmm. I guess the empty string does contain an empty string, but at what index? 1 maybe, using 1-based indexing, except there isn’t a first position in the string. Again, maybe empty is not a valid value to pass.
I looked at the Qt C++ QString, Javascript string and Excel FIND() function for answers. But they each give different answers and some of them aren’t even internally consistent. This is a simple comparison of the first index or last index of text v1 in text v2 in each (Excel doesn’t have an equivalent of lastIndexOf() that I am aware of):
Changing these to make the all the valid results 1-based and setting invalid results to -1, for easy comparison:
So:
Javascript disagrees with C++ QString and Excel on whether the first index of an empty string in an empty string is valid.
Javascript disagrees with C++ QString on whether the last index of an empty string in a non-empty string is the index of the last character or 1 after the last character.
C++ QString thinks the first index of an empty string in an empty string is the first character, but the last index of an empty string in an empty string is invalid.
It seems surprisingly difficult to come up with something intuitive and consistent! I think I am probably going to return an error message if either or both values are empty. This seems to me to be the only unambiguous and consistent approach.
I could return a 0 for a non-match or when one or both values are empty, but I think it is important to return different results in these 2 different cases. Also, not found and invalid feel qualitatively different to a calculated index to me, so shouldn’t be just another number. What do you think?
*** Update 14-Dec-2023 ***
I’ve been around the houses a bit more following feedback on this blog, the Easy Data Transform forum and hacker news and this what I have decided:
IndexOf() v1 in v2:
v1
v2
IndexOf(v1,v2)
1
aba
aba
1
a
a
1
a
aba
1
x
y
world
hello world
7
This is the same as Excel FIND() and differs from Javascript indexOf() (ignoring the difference in 0 or 1 based indexing) only for “”.indexOf(“”) which returns -1 in Javascript.
LastIndexOf() v1 in v2:
v1
v2
LastIndexOf(v1,v2)
1
aba
aba
4
a
a
1
a
aba
3
x
y
world
hello world
7
This differs from Javascript lastIndexOf() (ignoring difference in 0 or 1 based indexing) only for “”.indexOf(“”) which returns -1 in Javascript.
Conceptually the index is the 1-based index of the first (IndexOf) or last (LastIndexOf) position where, if the V1 is removed from the found position, it would have to be re-inserted in order to revert to V2. Thanks to layer8 on Hacker News for clarifying this.
Javascript and C++ QString return an integer and both use -1 as a placeholder value. But Easy Data Transform is returning a string (that can be interpreted as a number, depending on the transform) so we aren’t bound to using a numeric value. So I have left it blank where there is no valid result.
Now I’ve spent enough time down this rabbit hole and need to get on with something else! If you don’t like it you can always add an If with Calculate or use a Javascript transform to get the result you prefer.
*** Update 15-Dec-2023 ***
Quite a bit of debate on this topic on Hacker News.
Apple has transitioned Macs from Intel to ARM (M1/M2) chips. In the process it has provided an emulation layer (Rosetta2) to ensure that the new ARM Macs can still run applications created for Intel Macs. The emulation works very well, but is quoted to be some 20% slower than running native ARM binaries. That may not seem like a lot, but it is significant on processor intensive applications such as my own data wrangling software, which often processes datasets with millions of rows through complex sequences of merging, splitting, reformatting, filtering and reshaping. Also people who have just spent a small fortune on a shiny new ARM Mac can get grumpy about not having a native ARM binary to run on it. So I have been investigating moving Easy Data Transform from an Intel binary to a Universal (‘fat'[1]) binary containing both Intel and ARM binaries. This is a process familiar from moving my seating planner software for Mac from PowerPC to Intel chips some years ago. Hopefully I will have retired before the next chip change on the Mac.
My software is built on-top of the excellent Qt cross-platfom framework. Qt announced support for Mac Universal binaries in Qt 6.2 and Qt 5.15.9. I am sticking with Qt 5 for now, because it better supports multiple text encodings and because I don’t see any particular advantage to switching to Qt 6 yet. But, there is a wrinkle. Qt 5.15.3 and later are only available to Qt customers with commercial licenses. I want to use the QtCharts component in Easy Data Transform v2, and QtCharts requires a commercial license (or GPL, which is a no-go for me). I also want access to all the latest bug fixes for Qt 5. So I decided to switch from the free LGPL license and buy a commercial Qt license. Thankfully I was eligible for the Qt small business license which is currently $499 per year. The push towards commercial licensing is controversial with Qt developers, but I really appreciate Qt and all the work that goes into it, so I am happy to support the business (not enough to pay the eye-watering fee for a full enterprise license though!).
Moving from producing an Intel binary using LGPL Qt to producing a Universal binary using commercial Qt involved several major stumbling points that took me hours and a lot of googling to sort out. I’m going to spell them out here to save you that pain. You’re welcome.
The latest Qt 5 LTS releases are not available via the Qt maintenance tool if you have open source Qt installed. After you buy your commercial licence you need to delete your open source installation and all the associated license files. Here is the information I got from Qt support:
I assume that you were previously using open source version, is that correct?

Qt 5.15.10 should be available through the maintenance tool but it is required to remove the old open source installation completely and also remove the open source license files from your system.

So, first step is to remove the old Qt installation completely. Then remove the old open source licenses which might exist. Instructions for removing the license files:

****************************
Unified installer/maintenancetool/qtcreator will save all licenses (downloaded from the used Qt Account) inside the new qtlicenses.ini file. You need to remove the following files to fully reset the license information.

Windows
"C:/Users/%USERNAME%/AppData/Roaming/Qt/qtlicenses.ini"
"C:/Users/%USERNAME%/AppData/Roaming/Qt/qtaccount.ini"

Linux
"/home/$USERNAME/.local/share/Qt/qtlicenses.ini"
"/home/$USERNAME/.local/share/Qt/qtaccount.ini"

OS X
"/Users/$USERNAME/Library/Application Support/Qt/qtlicenses.ini"
"/Users/$USERNAME/Library/Application Support/Qt/qtaccount.ini"

As a side note: If the files above cannot be found $HOME/.qt-license(Linux/macOS) or %USERPROFILE%\.qt-license(Windows) file is used as a fallback. .qt-license file can be downloaded from Qt Account. https://account.qt.io/licenses
Be sure to name the Qt license file as ".qt-license" and not for example ".qt-license.txt".

***********************************************************************

After removing the old installation and the license files, please download the new online installer via your commercial Qt Account.
You can login there at:
https://login.qt.io/login

After installing Qt with commercial license, it should be able to find the Qt 5.15.10 also through the maintenance tool in addition to online installer.
Then you need to download the commercial installer from your online Qt account and reinstall all the Qt versions you need. Gigabytes of it. Time to drink some coffee. A lot of coffee.
In your .pro file you need to add:
macx {
QMAKE_APPLE_DEVICE_ARCHS = x86_64 arm64
}
Note that the above doubles the build time of your application, so you probably don’t want it set for day to day development.
You can use macdeployqt to create your deployable Universal .app but, and this is the critical step that took me hours to work out, you need to use <QtDir>/macos/bin/macdeployqt not <QtDir>/clang_64/bin/macdeployqt . Doh!
You can check the .app is Universal using the lipo command, e.g.:
I was able to use my existing practise of copying extra files (third party libraries, help etc) into the .app file and then digitally signing everything using codesign –deep [2]. Thankfully the only third party library I use apart from Qt (the excellent libXL library for Excel) is available as a Universal framework.
I did all the above on an Intel iMac using the latest Qt 5 LTS release (Qt 5.15.10) and XCode 13.4 on macOS 12. I then tested it on an ARM MacBook Air. No doubt you can also build Universal binaries on an ARM Mac.
Unsurprisingly the Universal app is substantially larger than the Intel-only version. My Easy Data Transform .dmg file (which also includes a lot of help documentation) went from ~56 MB to ~69 MB. However that is still positively anorexic compared to many bloated modern apps (looking at you Electron).
A couple of tests I did on an ARM MacBook Air showed ~16% improvement in performance. For example joining two 500,000 row x 10 column tables went from 4.5 seconds to 3.8 seconds. Obviously the performance improvement depends on the task and the system. One customer reported batch processing 3,541 JSON Files and writing the results to CSV went from 12.8 to 8.1 seconds, a 37% improvement.
[1] I’m not judging.
[2] Apparently the use of –deep is frowned on by Apple. But it works (for now anyway). Bite me, Apple.
Dark themes are now available for Windows 10 and Mac and it is increasingly expected that desktop applications will offer a dark theme. Previously Qt support for dark themes was patchy. But I am happy to say that it now seems to work fine with Qt 5.12.2, and I have added dark themes to both Windows and Mac versions of my Easy Data Transform and Hyper Plan applications.
Easy Data Transform for Mac with a dark theme:
Easy Data Transform for Windows with a dark theme:
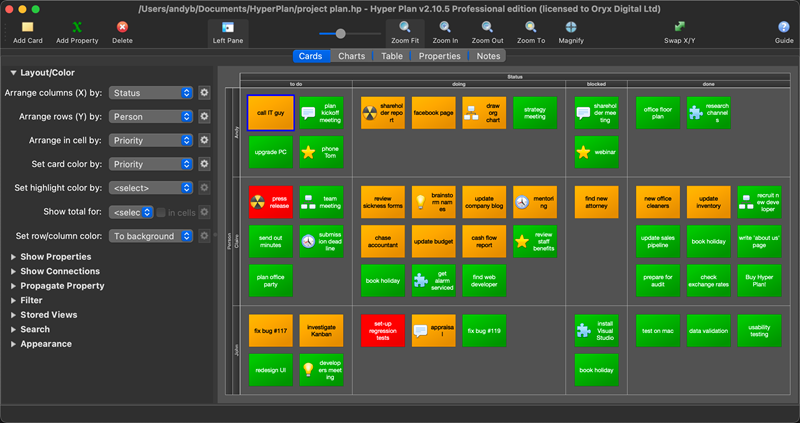
Hyper Plan for Mac with a dark theme:
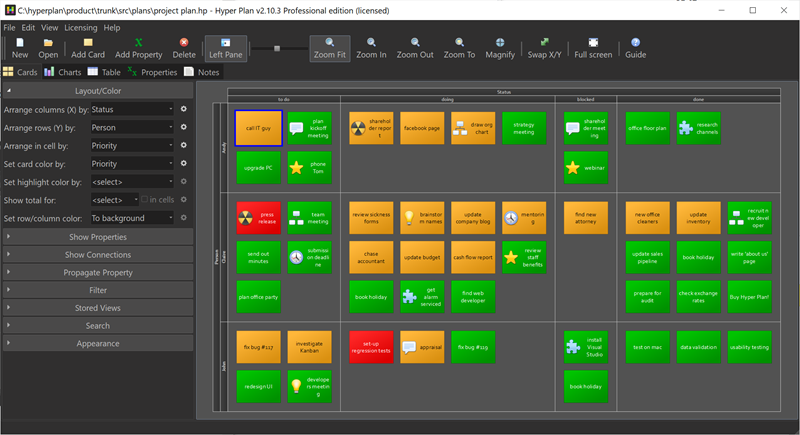
Hyper Plan for Windows with a dark theme:
I haven’t decided yet whether to add a dark theme to PerfectTablePlan.
Adding dark themes was a fair amount of work. But a lot of that was scouring forums to work out how to integrate with macOS and Windows. Hopefully this article will mean you don’t have to duplicate that work.
Dark themes work a bit differently on Windows and Mac. On Windows changing the UI theme to dark won’t directly affect your Qt application. But you can use an application stylesheet to set the appearance. On Mac changing the UI theme to dark will automatically change your application palette, unless you explicitly block this in your Info.plist file (see below). On both platforms you will need to change any icons you have set to the appropriate light/dark version when the theme changes. Some of this may change in future as dark themes are more closely integrated into Qt on Windows and Mac.
macOS
You can add the following helper functions to a .mm (Objective-C) file:
The macSetToLightTheme() and macSetToDarkTheme() are useful if you want to give the user the option to ignore the OS theme. Call macSetToAutoTheme() to set it back to the default.
Currently there seems to be no way to conect to a signal or event that shows the theme has changed in Windows. So I connected to a signal from a QTimer that fires every 5 seconds to check windowsIsInDarkTheme().
Icons
When the theme changes you potentially need to update any icons you have set, e.g. for the toolbar.
In a light theme you can usually set the active icons and let Qt calculate the corresponding disabled icons. This doesn’t work for a dark theme as you want the disabled icons to be darker than the enabled icons, rather than lighter. So you can either calculate the disabled icons programmatically or you can provide a set of disabled icons as well. I opted for the former.
Assuming your icons are set up as resources under :/icons/dark and :/icons/light you can do something like this:
QString getResourceName( const QString& iconName, bool dark )
{
    return QString( ":/icons/%1/%2" ).arg( dark ? "dark" : "light" ).arg( iconName );
}

QPixmap getPixmapResource( const QString& iconName, bool dark )
{
    QString resourceName = getResourceName( iconName, dark );
    QPixmap pixmap = QPixmap( resourceName );
    Q_ASSERT( !pixmap.isNull() );
    return pixmap;
}

QIcon getIconResource( const QString& iconName, bool dark )
{
    QIcon icon;
    QPixmap pixmap = getPixmapResource( iconName, dark );
    icon.addPixmap( pixmap );
    if ( dark )
    {
        // automatic disabled icon is no good for dark
        // paint transparent black to get disabled look
        QPainter p( &pixmap );
        p.fillRect( pixmap.rect(), QColor( 48, 47, 47, 128 ) );
        icon.addPixmap( pixmap, QIcon::Disabled );
    }
    return icon;
}
Then you can reset the icon for the appropriate theme with:
The colours used in Easy Data Transform make no difference to the output. But the colours are an important part of a user interface, especially when you using a tool for significant amounts of time. First impressions of the user interface are also important from a commercial point of view.
But colour is a very personal thing. Some people are colour-blind. Some people prefer light palettes and others dark palettes. Some people like lots of contrast and other don’t. So I am going to allow the user to fully customize the Center pane colours in Easy Data Transform.
I also want to include some standard colour schemes, to get people started. Looking around at other software it seems that the ‘modern’ trend is for pastel colours, invisible borders and subtle shadows. This looks lovely, but it is a bit low contrast for my tired old eyes. So I have tried to create a range of designs in that hope that everyone will like at least one. Below are the standard schemes I have come up with so far. They all stick with the convention pink=input, blue=transform, green=output.
Which is your favourite (click the images to enlarge).
Is there a tool that you use day to day that has particular nice colour scheme?
I hope to also add an optional dark theme for the rest of the UI in due course (Qt allowing).
Apple is switching the processor architecture of it’s Macs. Again (I transitioned PerfectTablePlan from PowerPC to Intel some hears ago). This time to their own M1 ARM chips. Reports so far have been very positive about speed and battery life of the new processors. Obviously most current Mac software has been written for Intel Macs, so they are using the Rosetta2 emulation layer to run apps compiled for Intel Macs on the ARM chips. I’m not sure how much of a performance hit this causes, but clearly it would be better to run native ARM binaries on an ARM machine. Also Apple, being Apple, want to move everyone to ARM as quickly as possible. Tough luck if you just spent big bucks on a shiny new Intel Mac.
One of my customers emailed me that the latest version of my Hyper Plan visual planner, built with Qt 5.13.1, didn’t run on an new M1 Mac. I don’t currently have an M1 Mac to test it on. But my Easy Data Transform software , built with Qt 5.15.2, apparently works fine on an M1 Mac. So I recompiled Hyper Plan using Qt 5.15.2, and was told it now works. I have found a couple of minor differences in behaviour between Qt 5.13.1 and 5.15.2, but they are too obscure to go into here. Some Qt apps may still have issues on ARM.
Currently Qt is only available as Intel binaries. Efforts are in progress to be able to build Qt as M1 (ARM) binaries. When that is complete it should be possible to ship Qt applications as a ‘fat binary’ with both Intel and ARM executables, as I did with the PowerPC to Intel transition. I’m not sure if this is going to be supported on Qt 5 and 6 or just Qt 6.
** Update Dec-2021 **
Qt 6.2 supports building M1 ARM and Intel binaries. There is no official support for M1 Arm binaries for Qt 5.
In my previous post I wrote about the trials and tribulations of upgrading my iMac to macOS 11.0. Here I am going to list some of the issues I know about deploying Qt applications on macOS 11.0. More issues may subsequently come to light.
The QFileDialog::DontConfirmOverwrite flag is ignored when passed to QFileDialog::getSaveFileName(). Which means that you can’t use this flag and handle the message yourself, or you will end up with a double warning. This seems to have been an issue since macOS 10.15. It still isn’t fixed in Qt 5.15.2. It is annoying, but relatively easy to work around. The Qt bug report is QTBUG-39791.
QMessageBox::information() shows a placeholder icon instead of the information icon:
It is only cosmetic. But it looks shonky and Mac users tend to care a lot about this sort of thing. I can reproduce it in Qt 5.15.2. I don’t know of a workaround. The Qt bug report is QTBUG-88928.
QMessageBox::warning(), QMessageBox::information() etc show the default focus button incorrectly. For example:
Again it is only cosmetic, but it looks jarring. I can reproduce it in Qt 5.15.2. I don’t know of a workaround. The Qt bug report is QTBUG-89133.
There are also some other styling issues. The Qt bug report is QTBUG-86513.
Dark Mode still doesn’t work properly for Qt apps.
There was an issue on macOS 10.15 where using QFileDialog::getSaveFileName() to save over an existing file could cause a crash. Thankfully that doesn’t seem to be an issue in macOS 10.11. The Qt bug report is QTBUG-83342.
Unfortunately issues with Qt on Mac are nothing new. I realize it is a big challenge for the Qt developers to keep such a large codebase up-to-date with so many continually evolving platforms. But the Mac version always feels rather neglected compared to the Windows version. I wish they would prioritise basic issues such as the above over adding whizzy new features, 80% of which most Qt developers probably never use. macOS 11.0 was released a couple of weeks ago and betas have been available for a while.
I would be interested to hear of the experience of other developers with macOS 11.0. Any other Qt macOS 11.0 issues I should know about? Please let me know in the comments.
It is always a bit of fraught process upgrading a computer OS, especially for a development machine with loads of tools and libraries installed. So I try to do it as infrequently as I can get away with. On Windows I generally buy a new PC rather than upgrade OS. However glitches had been reported in Easy Data Transform on macOS 11.0 (Big Sur) and I wasn’t ready to abandon my 2017 iMac, so I decided to bite the bullet and upgrade it from macOS 10.13 to 11.0.
The initial upgrade of OS was straightforward enough. But when I tried to run Qt Creator the CPU shot to 99% and stayed there, making the machine unusable. A glance at Activity Monitor showed that several XCode related processes were going crazy. After a bit a Googling I managed to find this magic incantation to type into the terminal on a forum post:
Annoyingly, I had to buy an upgrade of SnagIt as the 2018 version doesn’t work on Big Sur. Even more annoyingly the upgrade costs nearly as much as a new licence, which feels predatory.
The Subversion command line no longer worked from the terminal, but that was easily fixed by adding /Applications/XCode.app/Developer/usr/bin to PATH in my .profile.
So far I haven’t been able to get the following to work:
XCode
Hammer4Mac
XCode 10.1 falls over if I try to start it. It says that it requires additional components and then fails to install them. I may upgrade XCode at some point. But I only use the compiler from the command line via QtCreator, so it doesn’t really matter at present.
Hammer4Mac is a static website builder I use to build the PerfectTablePlan website and a couple of other mini sites. I upgraded to the latest version. It starts, but returns ‘Build failed’ for all 3 websites. No clue as to why. I Tweeted the creator, but got no reply. It appears to be abandonware. If so they should really take down the Hammer4Mac website. I guess I will use it from my macOS 10.14 laptop and then eventually do the tedious job of porting those websites to Jekyll.
Hopefully I won’t have to do another major upgrade of macOS any time soon (I may buy a new Mac next time).